本文为尚硅谷Flume课程随堂笔记
一、 项目介绍
在该案例中,我们以端口数据模拟日志,以是否存在“Hello”模拟不同类型的日志,我们需要自定义interceptor区分是否存在,将其分别发往不同的分析系统 (Channel)。
整个架构大致如下图: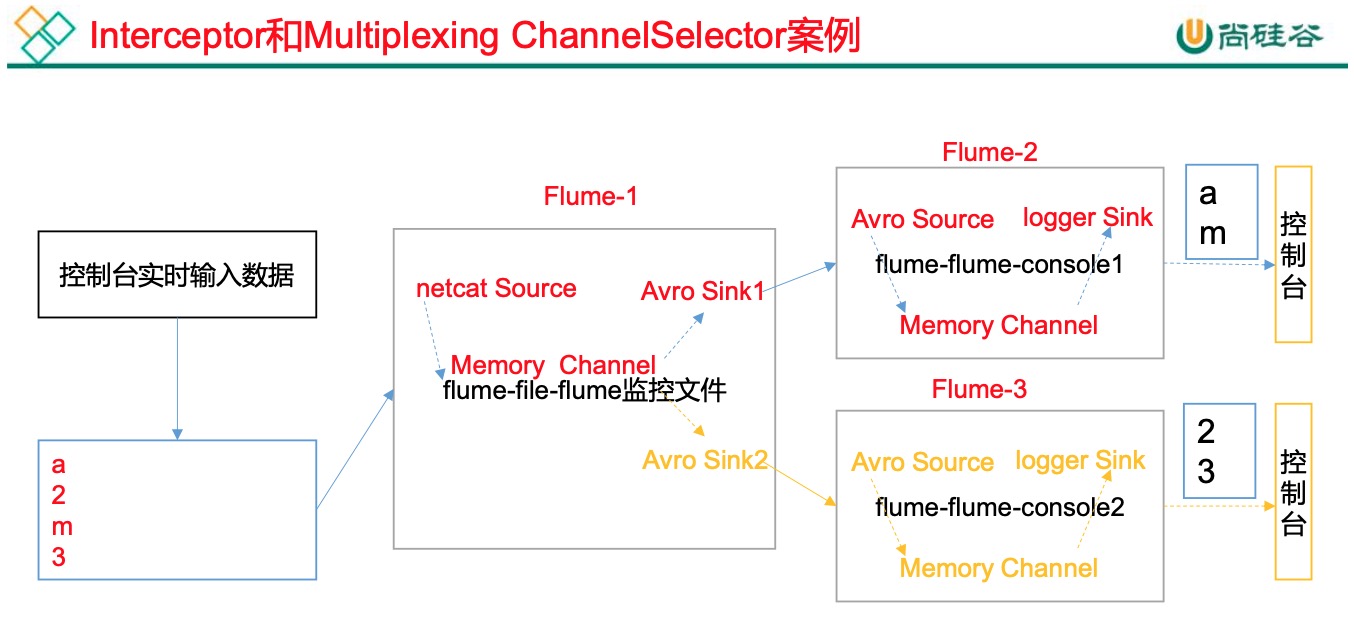
二、 构建拦截器代码
1.创建maven项目
1 | <dependency> |
2.创建自定义拦截器
1 | import org.apache.flume.Context; |
3. maven打包
将项目打包,并将项目放至flume的lib目录下
三、编写Flume相关配置
1. 编写flume1
编写flume1的配置文件flume1.conf1
2
3
4
5
6
7
8
9
10
11
12
13
14
15
16
17
18
19
20
21
22
23
24
25
26
27
28
29
30
31
32
33
34
35
36
37
38
39
40
41# Name
a1.sources = r1
a1.channels = c1 c2
a1.sinks = k1 k2
# Source
a1.sources.r1.type = netcat
a1.sources.r1.bind = localhost
a1.sources.r1.port = 44444
# Channel
a1.channels.c1.type = memory
a1.channels.c1.capacity = 1000
a1.channels.c1.transactionCapacity = 100
a1.channels.c2.type = memory
a1.channels.c2.capacity = 1000
a1.channels.c2.transactionCapacity = 100
# Sink
a1.sinks.k1.type = avro
a1.sinks.k1.hostname = localhost
a1.sinks.k1.port = 4141
a1.sinks.k2.type= avro
a1.sinks.k2.hostname = localhost
a1.sinks.k2.port = 4142
# Bind
a1.sources.r1.channels = c1 c2
a1.sinks.k1.channel = c1
a1.sinks.k2.channel = c2
# Channel Selector
a1.sources.r1.selector.type = multiplexing
a1.sources.r1.selector.header = type
a1.sources.r1.selector.mapping.suiwo = c1
a1.sources.r1.selector.mapping.inc = c2
# Interceptor
a1.sources.r1.interceptors = i1
# 使用拦截器全类名,$符号后的为Builder内部类名
a1.sources.r1.interceptors.i1.type = xyz.suiwo.flume.interceptor.TypeInterceptor$Builder
2. 编写flume2
书写flume2的配置文件flume2.conf1
2
3
4
5
6
7
8
9
10
11
12a2.sources = r2
a2.sinks = k2
a2.channels = c2
a2.sources.r2.type = avro
a2.sources.r2.bind = localhost
a2.sources.r2.port = 4141
a2.sinks.k2.type = logger
a2.channels.c2.type = memory
a2.channels.c2.capacity = 1000
a2.channels.c2.transactionCapacity = 100
a2.sinks.k2.channel = c2
a2.sources.r2.channels = c2
3. 编写flume3
书写flume3的配置文件flume3.conf1
2
3
4
5
6
7
8
9
10
11
12a3.sources = r3
a3.sinks = k3
a3.channels = c3
a3.sources.r3.type = avro
a3.sources.r3.bind = localhost
a3.sources.r3.port = 4142
a3.sinks.k3.type = logger
a3.channels.c3.type = memory
a3.channels.c3.capacity = 1000
a3.channels.c3.transactionCapacity = 100
a3.sinks.k3.channel = c3
a3.sources.r3.channels = c3
四、 启动测试
- 先启动flume2以及flume3最后启动flume1。
- 使用
netcat工具向44444端口发送消息。 - 经过测试发现,拦截功能已实现。