一、缓冲区基础
1. 常见概念
容量(Capacity)
缓冲区能够容纳的数据元素的最大数量。这一容量在缓冲区创建时被设定,并且永远不能被改变。上界(Limit)
缓冲区的第-一个不能被读或写的元素。或者说,缓冲区中现存元素的计数。位置(Position)
下一个要被读或写的元素的索引。位置会自动由相应的get()和put()函数更新。标记(Mark)
一个备忘位置。调用mark()来设定mark = postion。 调用reset()设定position = mark。标记在设定前是未定义的(undefined)。
这四个属性之间总是遵循以下关系:0 <= mark <= position <= limit <= capacity
2. Buffer类常见API
1 | package java.nio; |
可见常见的例如clear() 函数返回不是void而是返回this,也就是对象本身的引用。这种设计就允许级联调用的类设计方法。
例如:1
2
3
4
5
6buffer.mark( );
buffer.position(5);
buffer.reset( );
// 简写为:
buffer.mark().position(5).reset( );
3. 存取
为什么Buffer对象中没有定义get以及put函数?
Buffer API并没有包括get()或put()函数。每一个Buffer类都有这两个函数,但它们所采用的参数类型,以及它们返回的数据类型,对每个子类来说都是唯一的,所以它们不能在顶层 Buffer 类中被抽象地声明。它们的定义必须被特定类型的子类所遵从。
执行get和put的注意事项
对于put(),如果运算会导致位置超出上界,就会抛出
BufferOverflowException异常。对于get(),如果位置不小于上界,就会抛出BufferUnderflowException异常。绝对存取不会影响缓冲区的位置属性,但是如果您所提供的索引超出范围(负数或不小于上界),也将抛出IndexOutOfBoundsException异常。
4. 写入
写入到具体位置可以使用buffer.put(0,(byte)'M')这种方式接入。而buffer.put((byte)'w')方法不会收到影响,他总是在最后一个位置上写入数据。
5. 翻转
对于翻转我们可以使用buffer.limit(buffer.position()).position(0);来进行翻转,
他执行的逻辑就是先将buffer的上界设置为当前buffer的容量,同时将标记重置。然后将当前读/写的位置重置为起始位置。
其中buffer.limit(int)方法代码如下1
2
3
4
5
6
7
8
9
10
11
12
13
14
15
16
17
18
19
20
21
22 /**
* Sets this buffer's limit. If the position is larger than the new limit
* then it is set to the new limit. If the mark is defined and larger than
* the new limit then it is discarded.
*
* @param newLimit
* The new limit value; must be non-negative
* and no larger than this buffer's capacity
*
* @return This buffer
*
* @throws IllegalArgumentException
* If the preconditions on <tt>newLimit</tt> do not hold
*/
public final Buffer limit(int newLimit) {
if ((newLimit > capacity) || (newLimit < 0))
throw new IllegalArgumentException();
limit = newLimit;
if (position > limit) position = limit;
if (mark > limit) mark = -1;
return this;
}
buffer.position()代码如下1
2
3
4
5
6
7
8/**
* Returns this buffer's position.
*
* @return The position of this buffer
*/
public final int position() {
return position;
}
buffer.position(int)代码如下1
2
3
4
5
6
7
8
9
10
11
12
13
14
15
16
17
18
19
20/**
* Sets this buffer's position. If the mark is defined and larger than the
* new position then it is discarded.
*
* @param newPosition
* The new position value; must be non-negative
* and no larger than the current limit
*
* @return This buffer
*
* @throws IllegalArgumentException
* If the preconditions on <tt>newPosition</tt> do not hold
*/
public final Buffer position(int newPosition) {
if ((newPosition > limit) || (newPosition < 0))
throw new IllegalArgumentException();
position = newPosition;
if (mark > position) mark = -1;
return this;
}
由于这种翻转需求十分常见,所以Buffer类为我们提供了一个便利的翻转函数Buffer.flip()
代码如下。将上界设置为当前读/写位置,读/写位置置0,标志位重置。1
2
3
4
5
6
7
8
9
10
11
12
13
14
15
16
17
18
19
20
21
22
23
24
25
26
27/**
* Flips this buffer. The limit is set to the current position and then
* the position is set to zero. If the mark is defined then it is
* discarded.
*
* <p> After a sequence of channel-read or <i>put</i> operations, invoke
* this method to prepare for a sequence of channel-write or relative
* <i>get</i> operations. For example:
*
* <blockquote><pre>
* buf.put(magic); // Prepend header
* in.read(buf); // Read data into rest of buffer
* buf.flip(); // Flip buffer
* out.write(buf); // Write header + data to channel</pre></blockquote>
*
* <p> This method is often used in conjunction with the {@link
* java.nio.ByteBuffer#compact compact} method when transferring data from
* one place to another. </p>
*
* @return This buffer
*/
public final Buffer flip() {
limit = position;
position = 0;
mark = -1;
return this;
}
除了翻转函数flip(),还有一个常用函数,用来初始化读/写位置Buffer.rewind()
代码如下,他将当前读/写位置置0,将标记位重置。通过rewind()我们可以对已经读过得缓冲区数据进行重读1
2
3
4
5
6
7
8
9
10
11
12
13
14
15
16
17
18
19
20/**
* Rewinds this buffer. The position is set to zero and the mark is
* discarded.
*
* <p> Invoke this method before a sequence of channel-write or <i>get</i>
* operations, assuming that the limit has already been set
* appropriately. For example:
*
* <blockquote><pre>
* out.write(buf); // Write remaining data
* buf.rewind(); // Rewind buffer
* buf.get(array); // Copy data into array</pre></blockquote>
*
* @return This buffer
*/
public final Buffer rewind() {
position = 0;
mark = -1;
return this;
}
6. 释放
当我们接收到一个已经被填满的缓冲区的时候,我们可以通过通道的read()操作完成,当然我们需要在调用get()前对这个缓冲区进行翻转之后。
我们可以根据hasRemaining()方法来判断当前位置是否超出缓冲区的上界。我们可以通过下面这种方式来轮询获取缓冲区中的数据(在后续中,我们将学到进行批量传输的更高效的方法)。1
2
3for (int i = 0; buffer.hasRemaining(), i++) {
myByteArray[i] = buffer.get();
}
作为选择,remaining()函数将告知您从当前位置到上界还剩余的元素数目。您也可以通过下面的循环来释放缓冲区。
使用下面的好处就是不需要在每次循环的时候都进行重复检查。但是坏处就是这个无法在多线程的情况下同时从缓冲区中获取数据。1
2
3
4int count = buffer.remaining( );
for (int i = 0; i < count, i++) {
myByteArray[i] = buffer.get();
}
上述两个函数的代码如下1
2
3
4
5
6
7
8
9
10
11
12
13
14
15
16
17
18
19
20/**
* Returns the number of elements between the current position and the
* limit.
*
* @return The number of elements remaining in this buffer
*/
public final int remaining() {
return limit - position;
}
/**
* Tells whether there are any elements between the current position and
* the limit.
*
* @return <tt>true</tt> if, and only if, there is at least one element
* remaining in this buffer
*/
public final boolean hasRemaining() {
return position < limit;
}
在缓冲区中的对象完成读取释放后,他又可以进行重新使用。我们可以调用clear()函数将缓冲区重置为空的状态。
当然这个所谓的重置并不是真的将缓冲区中的数据进行删除,而是将数据的上界设置为容量值,同时将位置置0。
实际代码如下1
2
3
4
5
6
7
8
9
10
11
12
13
14
15
16
17
18
19
20
21
22
23/**
* Clears this buffer. The position is set to zero, the limit is set to
* the capacity, and the mark is discarded.
*
* <p> Invoke this method before using a sequence of channel-read or
* <i>put</i> operations to fill this buffer. For example:
*
* <blockquote><pre>
* buf.clear(); // Prepare buffer for reading
* in.read(buf); // Read data</pre></blockquote>
*
* <p> This method does not actually erase the data in the buffer, but it
* is named as if it did because it will most often be used in situations
* in which that might as well be the case. </p>
*
* @return This buffer
*/
public final Buffer clear() {
position = 0;
limit = capacity;
mark = -1;
return this;
}
下面是一段实例代码,演示如果写入以及释放缓冲区1
2
3
4
5
6
7
8
9
10
11
12
13
14
15
16
17
18
19
20
21
22
23
24
25
26
27
28
29
30
31
32
33
34
35
36
37
38
39import java.nio.CharBuffer;
public class BufferFillDrain {
private static int index = 0;
private static String[] strings = {
"A random string value",
"The product of an infinite number of monkeys",
"Hey hey we're the Monkees",
"Opening act for the Monkees: Jimi Hendrix",
"'Scuse me while I kiss this fly",
"Help Me! Help Me!"
};
public static void main(String[] args) {
final CharBuffer buffer = CharBuffer.allocate(100);
while (fillBuffer(buffer)) {
buffer.flip();
drainBuffer(buffer);
buffer.clear();
}
}
private static void drainBuffer(CharBuffer charBuffer) {
while (charBuffer.hasRemaining()) {
System.out.print(charBuffer.get());
}
System.out.println();
}
private static boolean fillBuffer(CharBuffer charBuffer) {
if (index >= strings.length) {
return false;
}
final String string = strings[index++];
for (int i = 0; i < string.length(); i++) {
charBuffer.put(string.charAt(i));
}
return true;
}
}
7. 压缩
当我们希望释放缓冲区的部分数据,然后保留剩余的数据继续进行填充。为了实现这一点,我们需要将未读的数据进行迁移,使未读的第一个数据索引为0。对此,Buffer类为我们提供了compact()函数来实现这一功能,尽管重复这样做会效率低下,但是相较于我们自己进行get()和put()函数来说,使用提供的compact()会高效得多。所以当需要的时候,建议使用compact()。
执行compact前
执行compact后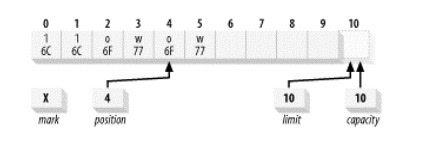
我们可以发现执行方法会
- 将2-5的元素复制到0-3的位置上,同时4-5不会有变动。
- 将postition移到4的位置也就是说,缓冲区现在被定位在缓冲区中最后一个“存活”元素后插入数据的位置。
- 将缓冲区的上界改为缓冲区的容量大小。
下面我们已经HeapByteBuffer类举例,看看如果实现一个compact()方法1
2
3
4
5
6
7
8
9
10
11
12public ByteBuffer compact() {
// 1. 使用数组拷贝将未读数据拷贝
System.arraycopy(hb, ix(position()), hb, ix(0), remaining());
// 2. 将缓冲区的位置放到缓冲区存活的数据后的数据的位置,也就是`limit - position`
// remaining() 返回的值为limit - position
position(remaining());
// 3. 将上界大小设置为缓冲区的容量大小
limit(capacity());
// 重置mark为-1
discardMark();
return this;
}
8. 标记
标记的作用是使缓冲区能够记住一个位置并在之后将其返回。
缓冲区的标记在调用mark()函数之前是未定义的。调用后会将当前位置赋值给标记。
函数代码如下1
2
3
4
5
6
7
8
9/**
* Sets this buffer's mark at its position.
*
* @return This buffer
*/
public final Buffer mark() {
mark = position;
return this;
}
而reset()方法则会将当前位置移动到标记值的位置1
2
3
4
5
6
7
8
9
10
11
12
13
14
15
16
17
18
19
20
21
22
23
24
25
26
27
28/**
* Resets this buffer's position to the previously-marked position.
*
* <p> Invoking this method neither changes nor discards the mark's
* value. </p>
*
* @return This buffer
*
* @throws InvalidMarkException
* If the mark has not been set
*/
public final Buffer reset() {
/**
* 此处定义临时变量个人认为主要目的是防止多个线程同时执行时导致的异常
*
* 如果不用一个局部变量m存储,那就会存在以下这种可能性
* 1. A线程判断 mark>=0,参数合法
* 2. B线程执行了类似于rewind(),clear(),flip()等可以将mark重置为-1的方法
* 3. A线程将mark赋值给position
*
* 但是如果使用了局部变量m就可以避免由于多个线程修改导致的问题。
*/
int m = mark;
if (m < 0)
throw new InvalidMarkException();
position = m;
return this;
}
如果新设定的值比当前的标记小,调用limit(int)或position(int)带有索引参数的版本会抛弃标记。
从代码中可以看到这两个函数在执行的时候都会对remark进行判断,如果不合法则置为-11
2
3
4
5
6
7
8
9
10
11
12
13
14
15
16
17
18
19
20
21
22
23
24
25
26
27
28
29
30
31
32
33
34
35
36
37
38
39
40
41
42
43/**
* Sets this buffer's position. If the mark is defined and larger than the
* new position then it is discarded.
*
* @param newPosition
* The new position value; must be non-negative
* and no larger than the current limit
*
* @return This buffer
*
* @throws IllegalArgumentException
* If the preconditions on <tt>newPosition</tt> do not hold
*/
public final Buffer position(int newPosition) {
if ((newPosition > limit) || (newPosition < 0))
throw new IllegalArgumentException();
position = newPosition;
if (mark > position) mark = -1;
return this;
}
 /**
  * Sets this buffer's limit.  If the position is larger than the new limit
  * then it is set to the new limit.  If the mark is defined and larger than
  * the new limit then it is discarded.
  *
  * @param  newLimit
  *         The new limit value; must be non-negative
  *         and no larger than this buffer's capacity
  *
  * @return  This buffer
  *
  * @throws  IllegalArgumentException
  *          If the preconditions on <tt>newLimit</tt> do not hold
 */
public final Buffer limit(int newLimit) {
    if ((newLimit > capacity) || (newLimit < 0))
        throw new IllegalArgumentException();
    limit = newLimit;
    if (position > limit) position = limit;
    if (mark > limit) mark = -1;
    return this;
}
假设我们执行下面这个函数,他会做什么操作?1
buffer.position(2).mark().position(4);
- 将缓冲区的位置置为2
- 将缓冲区的标记赋值为位置的值2
- 将缓冲区的位置置为4
最终结果如下图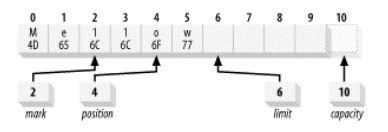
9. 比较
以ByteBuffer类为例1
2
3public abstract class ByteBuffer extends Buffer implements Comparable<ByteBuffer> {
// some code
}
他继承了Comparable接口,我们可以通过实现Comparable接口的compareTo()方法来实现两个Buffer的对比。
如果每个缓冲区中剩余的内容相同,那么equals()函数将返回true,否则返回false。因为这个测试是用于严格的相等而且是可换向的。前面的程序清单中的缓冲区名称可以颠倒,并会产生相同的结果。
与equals()相似,compareTo()不允许不同对象间进行比较。但compareTo()更为严格:如果您传递一个类型错误的对象,它会抛出ClassCastException异常,但equals()只会返回 false。
两个缓冲区被认为相等的充要条件是:
- 两个对象类型相同。包含不同数据类型的buffer永远不会相等,而且buffer绝不会等于非buffer对象。
- 两个对象都剩余同样数量的元素。Buffer的容量不需要相同,而且缓冲区中剩余数据的索引也不必相同。但每个缓冲区中剩余元素的数目(也就是从位置到上界的元素数量)必须相同。
- 在每个缓冲区中应被Get()函数返回的剩余数据元素序列必须一致。
如果不满足以上任意条件,就会返回false。
两个被认为是相等的缓冲区
可以看到在position到limit中的数据时一致的(limit位是还未存储的数据位)所以我们可以认为这两个Buffer相同。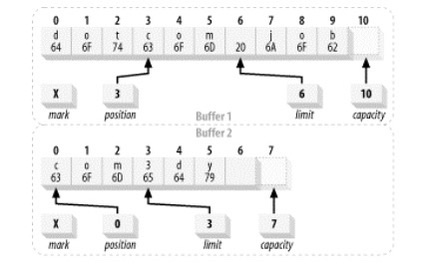
两个被认为不相等的缓冲区
虽然缓冲区中所存的数据是完全一致的,但是由于position到limit中的数据不一致,所以两个缓冲区不相等。
10. 批量移动
为了高效传输数据,Buffer类中提供了许多向缓冲区内外批量移动元素的函数。1
2
3
4
5
6
7
8public abstract class ByteBuffer extends Buffer implements Comparable<ByteBuffer> {
// This is a partial API listing
public ByteBuffer get (char [] dst)
public ByteBuffer get (char [] dst, int offset, int length)
public final ByteBuffer put (char[] src)
public ByteBuffer put (char [] src, int offset, int length)
public ByteBuffer put (ByteBuffer src)
}
第一种形式的get(char[] dst)只是将缓冲区中的数据复制到传入的数组中。
代码如下1
2
3
4
5
6
7
8
9
10
11
12
13
14
15
16
17
18
19
20
21
22
23/**
* Relative bulk <i>get</i> method.
*
* <p> This method transfers bytes from this buffer into the given
* destination array. An invocation of this method of the form
* <tt>src.get(a)</tt> behaves in exactly the same way as the invocation
*
* <pre>
* src.get(a, 0, a.length) </pre>
*
* @param dst
* The destination array
*
* @return This buffer
*
* @throws BufferUnderflowException
* If there are fewer than <tt>length</tt> bytes
* remaining in this buffer
*/
public ByteBuffer get(byte[] dst) {
// 底层实际的调用方法就是第二种get函数
return get(dst, 0, dst.length);
}
第二种形式get (char [] dst, int offset, int length)使用offset和length参数来指定目标数组的子区间。1
2
3
4
5
6
7
8
9
10
11
12
13
14
15
16
17
18
19
20
21
22
23
24
25
26
27
28
29
30
31
32
33
34
35
36
37
38
39
40
41
42
43
44
45
46
47
48
49
50
51
52
53
54
55
56
57
58
59
60/**
* Relative bulk <i>get</i> method.
*
* <p> This method transfers bytes from this buffer into the given
* destination array. If there are fewer bytes remaining in the
* buffer than are required to satisfy the request, that is, if
* <tt>length</tt> <tt>></tt> <tt>remaining()</tt>, then no
* bytes are transferred and a {@link BufferUnderflowException} is
* thrown.
*
* <p> Otherwise, this method copies <tt>length</tt> bytes from this
* buffer into the given array, starting at the current position of this
* buffer and at the given offset in the array. The position of this
* buffer is then incremented by <tt>length</tt>.
*
* <p> In other words, an invocation of this method of the form
* <tt>src.get(dst, off, len)</tt> has exactly the same effect as
* the loop
*
* <pre>{@code
* for (int i = off; i < off + len; i++)
* dst[i] = src.get():
* }</pre>
*
* except that it first checks that there are sufficient bytes in
* this buffer and it is potentially much more efficient.
*
* @param dst
* The array into which bytes are to be written
*
* @param offset
* The offset within the array of the first byte to be
* written; must be non-negative and no larger than
* <tt>dst.length</tt>
*
* @param length
* The maximum number of bytes to be written to the given
* array; must be non-negative and no larger than
* <tt>dst.length - offset</tt>
*
* @return This buffer
*
* @throws BufferUnderflowException
* If there are fewer than <tt>length</tt> bytes
* remaining in this buffer
*
* @throws IndexOutOfBoundsException
* If the preconditions on the <tt>offset</tt> and <tt>length</tt>
* parameters do not hold
*/
public ByteBuffer get(byte[] dst, int offset, int length) {
checkBounds(offset, length, dst.length);
// 判断获取的数据长度是否大于剩余的数据元素长度
if (length > remaining())
throw new BufferUnderflowException();
int end = offset + length;
for (int i = offset; i < end; i++)
dst[i] = get();
return this;
}
所以我们为了避免获取的数据元素大于剩余的元素的长度可以使用下面这种方式来解决。先获取剩余数据的长度然后在批量移动。1
2
3
4
5
6
7
8
9
10char [] bigArray = new char [1000];
// Get count of chars remaining in the buffer
int length = buffer.remaining( );
// Buffer is known to contain < 1,000 chars
buffer.get(bigArrray, 0, length);
// Do something useful with the data
processData (bigArray, length);
如果缓冲区存有比数组能容纳的数量更多的数据,您可以重复利用如下文所示的程序块进行读取:1
2
3
4
5
6char[] smallArray = new char[10];
while(buffer.hasRemaining()) {
int length = Math.min(buffer.remaining(), smallArray.length);
buffer.get(smallArray, 0, length);
processData(smallArray, length);
}
批量移入的逻辑与批量移出类似
第一种方式put(char[] src)实际代码如下,底层实际调用的就是第二种put1
2
3
4
5
6
7
8
9
10
11
12
13
14
15
16
17
18
19
20
21
22
23
24
25/**
* Relative bulk <i>put</i> method <i>(optional operation)</i>.
*
* <p> This method transfers the entire content of the given source
* byte array into this buffer. An invocation of this method of the
* form <tt>dst.put(a)</tt> behaves in exactly the same way as the
* invocation
*
* <pre>
* dst.put(a, 0, a.length) </pre>
*
* @param src
* The source array
*
* @return This buffer
*
* @throws BufferOverflowException
* If there is insufficient space in this buffer
*
* @throws ReadOnlyBufferException
* If this buffer is read-only
*/
public final ByteBuffer put(byte[] src) {
return put(src, 0, src.length);
}
第二种方式put (char [] src, int offset, int length),实际代码如下1
2
3
4
5
6
7
8
9
10
11
12
13
14
15
16
17
18
19
20
21
22
23
24
25
26
27
28
29
30
31
32
33
34
35
36
37
38
39
40
41
42
43
44
45
46
47
48
49
50
51
52
53
54
55
56
57
58
59
60/**
* Relative bulk <i>put</i> method <i>(optional operation)</i>.
*
* <p> This method transfers bytes into this buffer from the given
* source array. If there are more bytes to be copied from the array
* than remain in this buffer, that is, if
* <tt>length</tt> <tt>></tt> <tt>remaining()</tt>, then no
* bytes are transferred and a {@link BufferOverflowException} is
* thrown.
*
* <p> Otherwise, this method copies <tt>length</tt> bytes from the
* given array into this buffer, starting at the given offset in the array
* and at the current position of this buffer. The position of this buffer
* is then incremented by <tt>length</tt>.
*
* <p> In other words, an invocation of this method of the form
* <tt>dst.put(src, off, len)</tt> has exactly the same effect as
* the loop
*
* <pre>{@code
* for (int i = off; i < off + len; i++)
* dst.put(a[i]);
* }</pre>
*
* except that it first checks that there is sufficient space in this
* buffer and it is potentially much more efficient.
*
* @param src
* The array from which bytes are to be read
*
* @param offset
* The offset within the array of the first byte to be read;
* must be non-negative and no larger than <tt>array.length</tt>
*
* @param length
* The number of bytes to be read from the given array;
* must be non-negative and no larger than
* <tt>array.length - offset</tt>
*
* @return This buffer
*
* @throws BufferOverflowException
* If there is insufficient space in this buffer
*
* @throws IndexOutOfBoundsException
* If the preconditions on the <tt>offset</tt> and <tt>length</tt>
* parameters do not hold
*
* @throws ReadOnlyBufferException
* If this buffer is read-only
*/
public ByteBuffer put(byte[] src, int offset, int length) {
checkBounds(offset, length, src.length);
if (length > remaining())
throw new BufferOverflowException();
int end = offset + length;
for (int i = offset; i < end; i++)
this.put(src[i]);
return this;
}
剩余集中put就不再做展示,整体思路和上面两个put类似。
二、创建缓冲区
1. 相关API
类似于get()和put()函数,因为Buffer是实现类返回和写入类型不同,所以在Buffer类上没有这两个接口。
同样Buffer类上也没有创建缓冲区的方法allocate(int)。
下面我们以ByteBuffer为例看一下一些创建缓冲区的关键函数1
2
3
4
5
6
7
8
9public abstract class ByteBuffer extends Buffer implements Comparable<ByteBuffer> {
// This is a partial API listing
public static ByteBuffer allocate(int capacity)
public static ByteBuffer wrap(byte[] array)
public static ByteBuffer wrap(byte[] array, int offset, int length)
public final boolean hasArray()
public final byte[] array()
public final int arrayOffset()
}
2. 使用allocate(int)创建
缓冲区的创建是由分配或者包装操作来实现的。当我们要分配一个容量为100的ByteBuffer的时候可以执行下面这个方法1
ByteBuffer buffer = ByteBuffer.allocate(100);
函数源码如下1
2
3
4
5
6
7
8
9
10
11
12
13
14
15
16
17
18
19
20
21/**
* Allocates a new byte buffer.
*
* <p> The new buffer's position will be zero, its limit will be its
* capacity, its mark will be undefined, and each of its elements will be
* initialized to zero. It will have a {@link #array backing array},
* and its {@link #arrayOffset array offset} will be zero.
*
* @param capacity
* The new buffer's capacity, in bytes
*
* @return The new byte buffer
*
* @throws IllegalArgumentException
* If the <tt>capacity</tt> is a negative integer
*/
public static ByteBuffer allocate(int capacity) {
if (capacity < 0)
throw new IllegalArgumentException();
return new HeapByteBuffer(capacity, capacity);
}
可以看到他实际创建的是一个以堆为存储方式的ByteBuffer。也就是HeapByteBuffer。
通过阅读HeapByteBuffer的构造方法可以发现实际就是创建了一个大小为容量的byte数组1
2
3
4
5
6
7HeapByteBuffer(int cap, int lim) { // package-private
super(-1, 0, lim, cap, new byte[cap], 0);
/*
hb = new byte[cap];
offset = 0;
*/
}
3. 使用warp()创建
当我们自己创建了一个数组作为缓冲区的备份存储器,就可以使用warp()函数进行创建1
2byte [] myArray = new byte [100];
ByteBuffer buffer = ByteBuffer.wrap(myArray);
源码如下1
2
3
4
5
6
7
8
9
10
11
12
13
14
15
16
17
18
19
20
21
22
23
24
25
26
27
28
29
30
31
32
33
34
35
36
37
38
39
40/**
* Wraps a byte array into a buffer.
*
* <p> The new buffer will be backed by the given byte array;
* that is, modifications to the buffer will cause the array to be modified
* and vice versa. The new buffer's capacity will be
* <tt>array.length</tt>, its position will be <tt>offset</tt>, its limit
* will be <tt>offset + length</tt>, and its mark will be undefined. Its
* {@link #array backing array} will be the given array, and
* its {@link #arrayOffset array offset} will be zero. </p>
*
* @param array
* The array that will back the new buffer
*
* @param offset
* The offset of the subarray to be used; must be non-negative and
* no larger than <tt>array.length</tt>. The new buffer's position
* will be set to this value.
*
* @param length
* The length of the subarray to be used;
* must be non-negative and no larger than
* <tt>array.length - offset</tt>.
* The new buffer's limit will be set to <tt>offset + length</tt>.
*
* @return The new byte buffer
*
* @throws IndexOutOfBoundsException
* If the preconditions on the <tt>offset</tt> and <tt>length</tt>
* parameters do not hold
*/
public static ByteBuffer wrap(byte[] array,
int offset, int length)
{
try {
return new HeapByteBuffer(array, offset, length);
} catch (IllegalArgumentException x) {
throw new IndexOutOfBoundsException();
}
}
下面我们看看HeapByteBuffer如何创建,源码如下。
通过阅读源码可以知道实际上warp()函数并不是将offset开始的长度为length的数据创建。而是将整个数组的数据都写入缓冲区的备份存储器,并且这个缓冲区的位置为offset,上界为offset + length,容量为数组大小,标记未初始化。1
2
3
4
5
6
7
8
9
10
11
12
13
14
15
16
17
18
19
20
21HeapByteBuffer(byte[] buf, int off, int len) { // package-private
/**
* 可以看到mark标记位为-1
* 位置为offset
* 上界为offset+length
* 容量为数组的大小
*/
super(-1, off, off + len, buf.length, buf, 0);
/*
hb = buf;
offset = 0;
*/
}
// 他的父类构造器如下
ByteBuffer(int mark, int pos, int lim, int cap, // package-private
byte[] hb, int offset) {
super(mark, pos, lim, cap);
this.hb = hb;
this.offset = offset;
}
通过 allocate()或者 wrap()函数创建的缓冲区通常都是间接的,直接缓冲区我们会在后续进行讨论。
4. array()或者arrayOffset(),hasArray()介绍
- 使用
hasArray()函数来判断缓冲区是够有一个可以存取的备份数组, - 使用
array()函数来获取对应的字节数组, - 使用
arrayOffset()获取缓冲区第一个元素在这个缓冲区的的偏移量(从数组头 0 开始计算),如果您使用了带有三个参数的版本的wrap()函数来创建一个缓冲区,则arrayOffset()会一直返回 0,然而,如果 您切分了(可以使用slice()函数)由一个数组提供存储的缓冲区,得到的缓冲区可能会有一个非0的数组偏移量。这个数组偏移量和缓冲区容量值会告诉您数组中哪些元素是被缓冲区使用的。。
在调用
array()或者arrayOffset()前应该使用hasArray()来判断数组是否存在,否则会抛出异常
下面是三个函数的源码
2
3
4
5
6
7
8
9
10
11
12
13
14
15
16
17
18
19
20
21
22
23
24
25
26
27
28
29
30
31
32
33
34
35
36
37
38
39
40
41
42
43
44
45
46
47
48
49
50
51
52
53
54
55
56
57
58
59
60
61
62
63
64
65
66
67
68
69
* Tells whether or not this buffer is backed by an accessible byte
* array.
*
* <p> If this method returns <tt>true</tt> then the {@link #array() array}
* and {@link #arrayOffset() arrayOffset} methods may safely be invoked.
* </p>
*
* @return <tt>true</tt> if, and only if, this buffer
* is backed by an array and is not read-only
*/
public final boolean hasArray() {
return (hb != null) && !isReadOnly;
}
/**
* Returns the byte array that backs this
* buffer <i>(optional operation)</i>.
*
* <p> Modifications to this buffer's content will cause the returned
* array's content to be modified, and vice versa.
*
* <p> Invoke the {@link #hasArray hasArray} method before invoking this
* method in order to ensure that this buffer has an accessible backing
* array. </p>
*
* @return The array that backs this buffer
*
* @throws ReadOnlyBufferException
* If this buffer is backed by an array but is read-only
*
* @throws UnsupportedOperationException
* If this buffer is not backed by an accessible array
*/
public final byte[] array() {
if (hb == null)
throw new UnsupportedOperationException();
if (isReadOnly)
throw new ReadOnlyBufferException();
return hb;
}
/**
* Returns the offset within this buffer's backing array of the first
* element of the buffer <i>(optional operation)</i>.
*
* <p> If this buffer is backed by an array then buffer position <i>p</i>
* corresponds to array index <i>p</i> + <tt>arrayOffset()</tt>.
*
* <p> Invoke the {@link #hasArray hasArray} method before invoking this
* method in order to ensure that this buffer has an accessible backing
* array. </p>
*
* @return The offset within this buffer's array
* of the first element of the buffer
*
* @throws ReadOnlyBufferException
* If this buffer is backed by an array but is read-only
*
* @throws UnsupportedOperationException
* If this buffer is not backed by an accessible array
*/
public final int arrayOffset() {
if (hb == null)
throw new UnsupportedOperationException();
if (isReadOnly)
throw new ReadOnlyBufferException();
return offset;
}
三、复制缓冲区
首先我们先介绍一个概念
我们可以创建描述从外部存储到数组中的数据元素的缓冲区对象。但是缓冲区不限于管理数组中的外部数据。它们也能管理其他缓冲区中的外部数据。当一个管理其他缓冲器所包含的数据元素的缓冲器被创建时,这个缓冲器被称为
视图缓冲器。
1. 相关API
复制缓冲区就是从当前缓冲区对象中复制出来一个新的缓冲区对象,我们以ByteBuffer为例,相关的api如下1
2
3
4
5
6public abstract class ByteBuffer extends Buffer implements Comparable<ByteBuffer> {
// This is a partial API listing
public abstract ByteBuffer duplicate();
public abstract ByteBuffer asReadOnlyBuffer();
public abstract ByteBuffer slice();
}
2. 使用duplicate()复制
首先介绍duplicate()函数,他是创建一个共享当前缓冲区内容的新缓冲区,两个缓冲区共享数据元素,一个缓冲区数据的改变也会影响另一个缓冲区中的数据。但是每个缓冲区拥有各自的位置,上界,标记属性。如果原始的缓冲区为只读或者直接缓冲区,新的缓冲区也将继承这些属性(直接缓冲区的内容会在后续进行介绍)。
函数源码如下1
2
3
4
5
6
7
8
9
10
11
12
13
14
15
16
17
18
19
20
21
22
23
24
25
26/**
* Creates a new byte buffer that shares this buffer's content.
*
* <p> The content of the new buffer will be that of this buffer. Changes
* to this buffer's content will be visible in the new buffer, and vice
* versa; the two buffers' position, limit, and mark values will be
* independent.
*
* <p> The new buffer's capacity, limit, position, and mark values will be
* identical to those of this buffer. The new buffer will be direct if,
* and only if, this buffer is direct, and it will be read-only if, and
* only if, this buffer is read-only. </p>
*
* @return The new byte buffer
*/
public abstract ByteBuffer duplicate();
// 抽象方法的实现以HeapByteBuffer为例实现如下
public ByteBuffer duplicate() {
return new HeapByteBuffer(hb,
this.markValue(),
this.position(),
this.limit(),
this.capacity(),
offset);
}
3. 使用asReadOnlyBuffer()复制
我们还可以使用asReadOnlyBuffer()函数来生成一个只读的缓冲区视图。与duplicate()相比,这种方式创建的新缓冲区不允许使用put(),并且其isReadOnly()函数将会返回true。对这一只读缓冲区的put()函数的调用尝试会导致抛出ReadOnlyBufferException异常。
函数源码如下1
2
3
4
5
6
7
8
9
10
11
12
13
14
15
16
17
18
19
20
21
22
23
24
25
26
27
28
29
30/**
* Creates a new, read-only byte buffer that shares this buffer's
* content.
*
* <p> The content of the new buffer will be that of this buffer. Changes
* to this buffer's content will be visible in the new buffer; the new
* buffer itself, however, will be read-only and will not allow the shared
* content to be modified. The two buffers' position, limit, and mark
* values will be independent.
*
* <p> The new buffer's capacity, limit, position, and mark values will be
* identical to those of this buffer.
*
* <p> If this buffer is itself read-only then this method behaves in
* exactly the same way as the {@link #duplicate duplicate} method. </p>
*
* @return The new, read-only byte buffer
*/
public abstract ByteBuffer asReadOnlyBuffer();
// 抽象方法的实现以HeapByteBuffer为例实现如下
public ByteBuffer asReadOnlyBuffer() {
// 此处创建的是一个只读ByteBuffer
return new HeapByteBufferR(hb,
this.markValue(),
this.position(),
this.limit(),
this.capacity(),
offset);
}
下面我们来尝试复制一个缓冲区1
2
3
4ByteBuffer buffer = ByteBuffer.allocate(8);
buffer.position(3).limit(6).mark().position(5);
ByteBuffer dupeBuffer = buffer.duplicate();
buffer.clear();
执行完后两个缓冲区数据如下图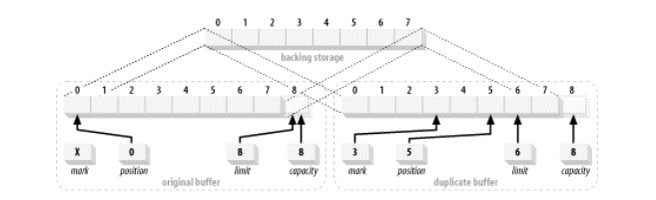
4. 使用slice()切片复制
分割缓冲区与复制相似,但是slice()创建了一个从原始缓冲区的当前位置开始的信缓冲区,并且新缓冲区的容量是原始缓冲区的剩余数量也就是(limit-position)。这个新缓冲区与原始缓冲区共享一段数据元素子序列。分割出来的缓冲区也会继承只读和直接属性。
源码如下1
2
3
4
5
6
7
8
9
10
11
12
13
14
15
16
17
18
19
20
21
22
23
24
25
26
27
28
29
30
31
32
33/**
* Creates a new byte buffer whose content is a shared subsequence of
* this buffer's content.
*
* <p> The content of the new buffer will start at this buffer's current
* position. Changes to this buffer's content will be visible in the new
* buffer, and vice versa; the two buffers' position, limit, and mark
* values will be independent.
*
* <p> The new buffer's position will be zero, its capacity and its limit
* will be the number of bytes remaining in this buffer, and its mark
* will be undefined. The new buffer will be direct if, and only if, this
* buffer is direct, and it will be read-only if, and only if, this buffer
* is read-only. </p>
*
* @return The new byte buffer
*/
public abstract ByteBuffer slice();
// 抽象方法的实现以HeapByteBuffer为例实现如下
public ByteBuffer slice() {
int pos = this.position();
int lim = this.limit();
int rem = (pos <= lim ? lim - pos : 0);
// 这里我们可以看到slice创建的ByteBuffer与之前带有三个参数的版本的wrap()函数来创建一个缓冲区不同
// 这里新缓冲区的offset不是0而是原始缓冲区的pos + offset
return new HeapByteBuffer(hb,
-1,
0,
rem,
rem,
pos + offset);
}
下面我们尝试分割一个缓冲区1
2
3ByteBuffer buffer = ByteBuffer.allocate(8);
buffer.position(3).limit(5);
ByteBuffer sliceBuffer = buffer.slice();
创建的缓冲区如下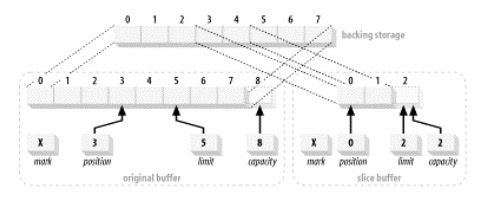
要创建一个映射到位置12-20(9个元素)的 buffer对象,应使用下面的代码实现:1
2
3
4byte[] myBuffer = new byte[100];
ByteBuffer cb = ByteBuffer.wrap(myBuffer);
cb.position(12).limit(21);
ByteBuffer sliced = cb.slice();
四、字节缓冲区
所有的基本数据类型都有相应的缓冲区类(布尔型除外),但字节缓冲区有自己的独特之处。字节是操作系统及其 I/O 设备使用的基本数据类型。当在 JVM 和操作系统间传递数据时,将其他的数据类型拆分成构成它们的字节是十分必要的。如我们在后面的章节中将要看到的那样,系统层次的 I/O 面向字节的性质可以在整个缓冲区的设计以及它们互相配合的服务中感受到。
1. ByteBuffer类完整API
1 | package java.nio; |
2. 字节顺序
此章忽略
3. 直接缓冲区
推荐观看这个up的视频,讲的非常好 视频链接
首先简单概括一下什么是直接缓冲区
在我们之前使用的缓冲区都是堆内的缓冲区,而直接缓冲区则是可以从堆外申请内存来进行数据的保存,采用操作系统本地的I/O会比堆缓冲区更快一些。
下面我们摘抄一下JAVA NIO一书中的介绍1
2
3
4
5
6
7
8
9
10
11
12
13操作系统的在内存区域中进行 I/O 操作。这些内存区域,就操作系统方面而言,是相连的字节序列。于是,毫无疑问,只有字节缓冲区有资格参与I/O 操作。也请回想一下操作系统会直接存取进程——在本例中是 JVM 进程的内存空间,以传输数据。这也意味着 I/O 操作的目标内存区域必须是连续的字节序列。在 JVM 中,字节数组可能不会在内存中连续存储,或者无用存储单元收集可能随时对其进行移动。在 Java 中,数组是对象,而数据存储在对象中的方式在不同的 JVM 实现中都各有不同。
出于这一原因,引入了直接缓冲区的概念。直接缓冲区被用于与通道和固有 I/O 例程交互。它们通过使用固有代码来告知操作系统直接释放或填充内存区域,对用于通道直接或原始存取的内存区域中的字节元素的存储尽了最大的努力。
直接字节缓冲区通常是 I/O 操作最好的选择。在设计方面,它们支持 JVM 可用的最高效 I/O 机制。非直接字节缓冲区可以被传递给通道,但是这样可能导致性能损耗。通常非直接缓冲不可能成为一个本地 I/O 操作的目标。如果您向一个通道中传递一个非直接 ByteBuffer 对象用于写入,通道可能会在每次调用中隐含地进行下面的操作:
1.创建一个临时的直接 ByteBuffer 对象。
2.将非直接缓冲区的内容复制到临时缓冲中。
3.使用临时缓冲区执行低层次 I/O 操作。
4.临时缓冲区对象离开作用域,并最终成为被回收的无用数据。
这可能导致缓冲区在每个 I/O 上复制并产生大量对象,而这种事都是我们极力避免的。不过,依靠工具,事情可以不这么糟糕。运行时间可能会缓存并重新使用直接缓冲区或者执行其他一些聪明的技巧来提高吞吐量。如果您仅仅为一次使用而创建了一个缓冲区,区别并不是很明显。另一方面,如果您将在一段高性能脚本中重复使用缓冲区,分配直接缓冲区并重新使用它们会使您游刃有余。
直接缓冲区时 I/O 的最佳选择,但可能比创建非直接缓冲区要花费更高的成本。直接缓冲区使用的内存是通过调用本地操作系统方面的代码分配的,绕过了标准 JVM 堆栈。建立和销毁直接缓冲区会明显比具有堆栈的缓冲区更加优秀,这取决于主操作系统以及 JVM 实现。直接缓冲区的内存区域不受无用存储单元收集支配,因为它们位于标准 JVM 堆栈之外。
使用直接缓冲区或非直接缓冲区的性能权衡会因JVM,操作系统,以及代码设计而产生巨大差异。通过分配堆栈外的内存,您可以使您的应用程序依赖于JVM未涉及的其它力量。当加入其他的移动部分时,确定您正在达到想要的效果。我以一条旧的软件行业格言建议您:先使其工作,再加快其运行。不要一开始就过多担心优化问题;首先要注重正确性。JVM实现可能会执行缓冲区缓存或其他的优化,这会在不需要您参与许多不必要工作的情况下为您提供所需的性能。
3.1 创建直接缓冲区
下面我们从ByteBuffer的allocateDirect()函数中探寻一下他是如何创建一个直接缓冲区
下面是函数源码1
2
3
4
5
6
7
8
9
10
11
12
13
14
15
16
17
18
19/**
* Allocates a new direct byte buffer.
*
* <p> The new buffer's position will be zero, its limit will be its
* capacity, its mark will be undefined, and each of its elements will be
* initialized to zero. Whether or not it has a
* {@link #hasArray backing array} is unspecified.
*
* @param capacity
* The new buffer's capacity, in bytes
*
* @return The new byte buffer
*
* @throws IllegalArgumentException
* If the <tt>capacity</tt> is a negative integer
*/
public static ByteBuffer allocateDirect(int capacity) {
return new DirectByteBuffer(capacity);
}
我们可以看到到我们创建一个直接缓冲区时,他会去new一个DirectByteBuffer对象
下面是DirectByteBuffer类的构造方法,从下面我们可以看到直接缓冲区是使用java的unsafe类直接申请内存。
那申请的内存在清除后什么时候被回收,我们可以深入阅读Cleaner类。在里面我们可以看到他其实是一个虚引用的类,当他没有被强引用的情况下就会被回收。1
2
3
4
5
6
7
8
9
10
11
12
13
14
15
16
17
18
19
20
21
22
23
24
25
26
27
28
29
30
31
32
33
34
35
36DirectByteBuffer(int cap) { // package-private
// 基础的定义上界,位置,容量,标记位等信息
super(-1, 0, cap, cap);
// 是否直接内存分页对齐,操作系统相关信息
boolean pa = VM.isDirectMemoryPageAligned();
// 页大小
int ps = Bits.pageSize();
// 计算需要申请的内存大小
long size = Math.max(1L, (long)cap + (pa ? ps : 0));
// 判断内存是否足够
Bits.reserveMemory(size, cap);
long base = 0;
try {
// 尝试申请内存
base = unsafe.allocateMemory(size);
} catch (OutOfMemoryError x) {
// 如果出现OOM将一开始的保留内存进行释放
Bits.unreserveMemory(size, cap);
throw x;
}
// 将申请的内存中的数据进行置0
unsafe.setMemory(base, size, (byte) 0);
// 计算申请的内存空间的地址并赋值给address
if (pa && (base % ps != 0)) {
// Round up to page boundary
address = base + ps - (base & (ps - 1));
} else {
address = base;
}
// 创建一个cleaner对象
cleaner = Cleaner.create(this, new Deallocator(base, size, cap));
// 这个参数的含义我们会在后面的直接缓冲区的复制那部分降到
att = null;
}
下面我们看看cleaner中的实际如何进行内存的释放1
2
3
4
5
6
7
8
9
10
11
12
13
14
15
16
17
18
19
20
21
22
23
24
25
26
27
28
29private static class Deallocator
implements Runnable {
private static Unsafe unsafe = Unsafe.getUnsafe();
private long address;
private long size;
private int capacity;
private Deallocator(long address, long size, int capacity) {
assert (address != 0);
this.address = address;
this.size = size;
this.capacity = capacity;
}
public void run() {
// 如果地址为0,表示已经被释放过了
if (address == 0) {
// Paranoia
return;
}
// 将内存进行释放
unsafe.freeMemory(address);
// 将地址置0
address = 0;
// 取消保留内存
Bits.unreserveMemory(size, capacity);
}
}
3.2 直接缓冲区如何get()
下面是方法源码,从源码中我们可以看到在获取数据的时候,会通过,计算地址所在的位置来获取对应的数据1
2
3
4
5
6
7
8
9
10
11
12
13
14
15
16
17
18
19
20
21
22public byte get() {
return ((unsafe.getByte(ix(nextGetIndex()))));
}
private long ix(int i) {
return address + ((long)i << 0);
}
/**
* Checks the current position against the limit, throwing a {@link
* BufferUnderflowException} if it is not smaller than the limit, and then
* increments the position.
*
* @return The current position value, before it is incremented
*/
final int nextGetIndex() { // package-private
int p = position;
if (p >= limit)
throw new BufferUnderflowException();
position = p + 1;
return p;
}
get(int)函数再次就不再进行介绍,自行阅读源码
3.3 直接缓冲区如何put()
下面是方法源码,从源码中我们可以看到与get逻辑类似,获取到下一步要put数据的地址,然后将数据写入内存1
2
3
4
5
6
7
8
9
10
11
12
13
14
15
16
17
18
19
20
21
22
23public ByteBuffer put(byte x) {
unsafe.putByte(ix(nextPutIndex()), ((x)));
return this;
}
private long ix(int i) {
return address + ((long)i << 0);
}
/**
* Checks the current position against the limit, throwing a {@link
* BufferOverflowException} if it is not smaller than the limit, and then
* increments the position.
*
* @return The current position value, before it is incremented
*/
final int nextPutIndex() { // package-private
int p = position;
if (p >= limit)
throw new BufferOverflowException();
position = p + 1;
return p;
}
put(int)函数再次就不再进行介绍,自行阅读源码
3.4 复制直接缓冲区
下面我们看看直接缓冲区如何进行复制
我们从复制的源码入手1
2
3
4
5
6
7
8
9
10
11
12
13
14
15
16
17
18
19
20
21
22public ByteBuffer duplicate() {
return new DirectByteBuffer(this,
this.markValue(),
this.position(),
this.limit(),
this.capacity(),
0);
}
DirectByteBuffer(DirectBuffer db, // package-private
int mark, int pos, int lim, int cap,
int off) {
// 基础的定义上界,位置,容量,标记位等信息
super(mark, pos, lim, cap);
// 将被复制对象的内存地址赋值给复制的缓冲区对象
address = db.address() + off;
// 这里的cleaner不需要赋值,因为他本身不需要去考虑内存的释放,实际的释放是由被复制的对象进行
cleaner = null;
// 从这里我们就知道att的作用了,因为我们所谓的复制是和被复制的缓冲区对象使用同一片内存,
// 假设被复制的缓冲区对象没有被任何对象强引用,这个时候就可能会被JVM的GC删除,所以我们让att强引用了被复制的缓冲区对象,这样哪怕被复制的缓冲区对象被原来强引用的对象断除引用也不会导致这块内存被垃圾回收
att = db;
}
slice()函数再次就不再进行介绍,自行阅读源码
4. 视图缓冲区
我们之前已经见过了一些的简单例子,在例子中一个缓冲区被复制和切分。ByteBuffer 类允许创建视图来将 byte 型缓冲区字节数据映射为其它的原始数据类型。例如,asLongBuffer()函数 创建一个将八个字节型数据当成一个 long 型数据来存取的视图缓冲区。
下面列出的每一个工厂方法都在原有的 ByteBuffer 对象上创建一个视图缓冲区。调用其中的任何一个方法都会创建对应的缓冲区类型,这个缓冲区是基础缓冲区的一个切分,由基 础缓冲区的位置和上界决定。新的缓冲区的容量是字节缓冲区中存在的元素数量除以视图类型中组成一个数据类型的字节数。在切分中任一个超过上界的元素对于这个视图 缓冲区都是不可见的。视图缓冲区的第一个元素从创建它的 ByteBuffer 对象的位置开始 (positon()函数的返回值)。具有能被自然数整除的数据元素个数的视图缓冲区是一种较好的实现。
4.1 视图缓冲区相关API
1 | public abstract class ByteBuffer extends Buffer implements Comparable<ByteBuffer> { |
4.2 ByteBuffer -> CharBuffer
下面我们就医ByteBuffer -> CharBuffer为例1
2ByteBuffer byteBuffer = ByteBuffer.allocate(7).order(ByteOrder.BIG_ENDIAN);
CharBuffer charBuffer = byteBuffer.asCharBuffer();
下面是复制的charBuffer的视图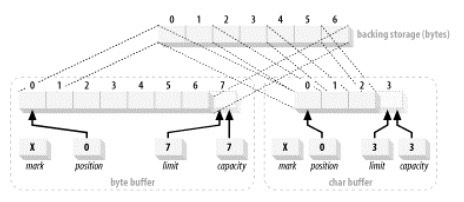
下面我们尝试代码运行一下1
2
3
4
5
6
7
8
9
10
11
12
13
14
15
16
17
18
19
20
21
22public class BufferCharView {
public static void main(String[] argv) throws Exception {
ByteBuffer byteBuffer = ByteBuffer.allocate(7).order(ByteOrder.BIG_ENDIAN);
CharBuffer charBuffer = byteBuffer.asCharBuffer();
// Load the ByteBuffer with some bytes
byteBuffer.put(0, (byte) 0);
byteBuffer.put(1, (byte) 'H');
byteBuffer.put(2, (byte) 0);
byteBuffer.put(3, (byte) 'i');
byteBuffer.put(4, (byte) 0);
byteBuffer.put(5, (byte) '!');
byteBuffer.put(6, (byte) 0);
println(byteBuffer);
println(charBuffer);
}
// Print info about a buffer
private static void println(Buffer buffer) {
System.out.println("pos=" + buffer.position() + ", limit=" + buffer.limit() + ", capacity=" + buffer.capacity()
+ ": '" + buffer.toString() + "'");
}
}
运行结果如下1
2pos=0, limit=7, capacity=7: 'java.nio.HeapByteBuffer[pos=0 lim=7 cap=7]'
pos=0, limit=3, capacity=3: 'Hi!'
5. 数据元素视图
ByteBuffer 类提供了一个不太重要的机制来以多字节数据类型的形式存取 byte 数据组。ByteBuffer类为每一种原始数据类型提供了存取的和转化的方法:
5.1 数据元素视图相关API
1 | public abstract class ByteBuffer extends Buffer implements Comparable<ByteBuffer> |
5.2 从ByteBuffer中获取int或者long类型元素
假设一个叫 buffer 的 ByteBuffer 对象处于下图的状态。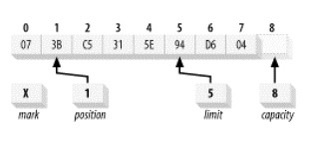
这段代码:1
int value = buffer.getInt( );
由于int为4个字节,会返回一个由缓冲区中位置 1-4 的 byte 数据值组成的 int 型变量的值。实际的返回值取决于缓冲区的当前的比特排序(byte-order)设置。
更具体的写法是:1
int value = buffer.order (ByteOrder.BIG_ENDIAN).getInt( );
这将会返回值 0x3BC5315E,同时:1
int value = buffer.order (ByteOrder.LITTLE_ENDIAN).getInt( );
返回值 0x5E31C53B。
如果您试图获取的原始类型需要比缓冲区中存在的字节数更多的字节,会抛出 BufferUnderflowException。如我们执行下面这行代码1
2// 一个 long 型变量是 8 个字节的,但是缓冲区中只有 5 个字节,所以会抛出 BufferUnderflowException
long value = buffer.getLong( );
6. 内存映射缓冲区
映射缓冲区是带有存储在文件,通过内存映射来存取数据元素的字节缓冲区。映射缓冲区通常是直接存取内存的,只能通过 FileChannel 类创建。映射缓冲区的用法和直接缓冲区类似,但是 MappedByteBuffer 对象可以处理独立于文件存取形式的的许多特定字符。出于这个原因,我们会在讲内存映射文件的时候讲到这部分内容。