一、通道基础概念与使用
1.1 Channel定义
首先我们先看一下Channel的接口定义1
2
3
4
5
6public interface Channel extends Closeable {
// 判断接口是否打开
public boolean isOpen();
// 关闭一个打开的通道。
public void close() throws IOException;
}
下面我们来观察一下Channel的两种常见实现。WritableByteChannel 和 ReadableByteChannel。这两种分别表示可写的字节通道以及可读的字节通道。
1.1.1 WritableByteChannel接口和ReadableByteChannel接口
WritableByteChannel接口定义1
2
3public interface WritableByteChannel extends Channel {
public int write(ByteBuffer src) throws IOException;
}
ReadableByteChannel接口定义1
2
3public interface ReadableByteChannel extends Channel {
public int read(ByteBuffer dst) throws IOException;
}
1.1.2 ByteChannel类
除此之外,还有一个ByteChannel类,同时实现了上述两个接口1
2
3public interface ByteChannel extends ReadableByteChannel, WritableByteChannel {
}
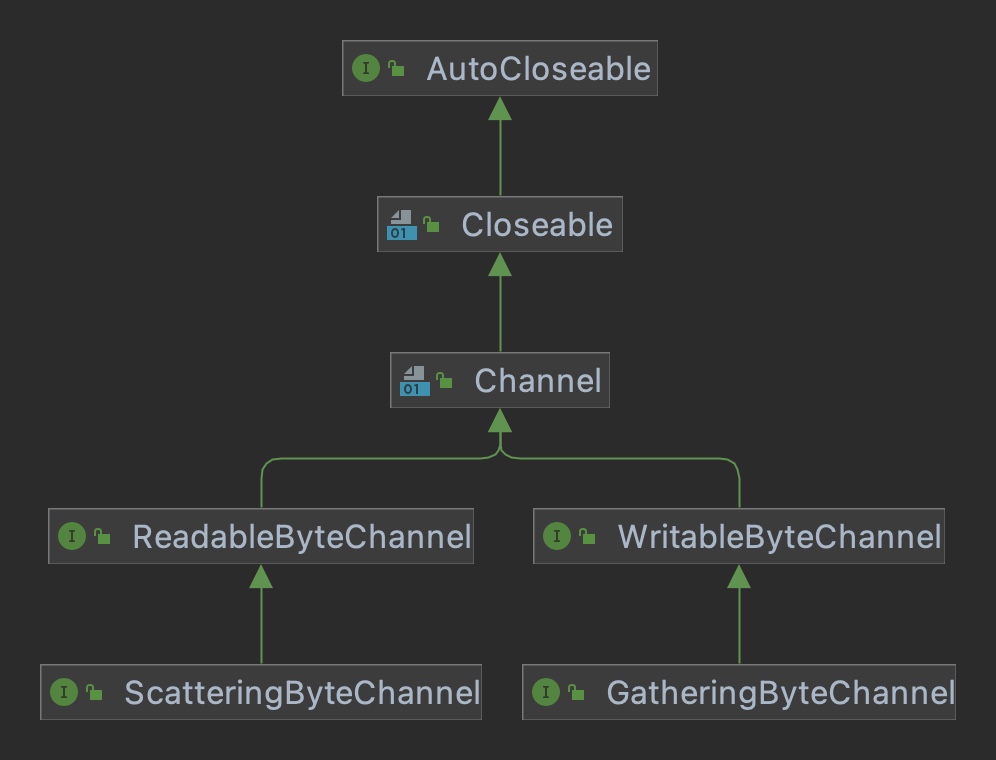
ByteChannel接口本身并不定义新的 API 方法,它是一种用来聚集它自己以一个新名称继承的多个接口的便捷接口。根据定义,实现ByteChannel类的通道会同时实现 ReadableByteChannel 和 WritableByteChannel 两个接口,所以此类通道是双向的。这是简化类定义的语法糖(syntactic sugar),它使得用操作器(operator)实例来测试通道对象变得更加简单。
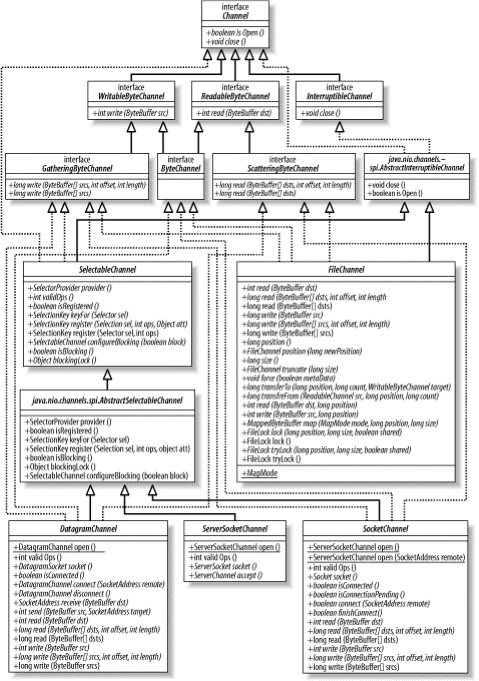
下面是我们讲到的几个接口的继承关系
1.1.3 InterruptibleChannel接口
InterruptibleChannel接口表示如果连接可中断通道的线程被中断,则该通道会以一种特别的方式已进行工作。具体我们会在后续进行讨论。
我们还会发现类层次结构中有两个类位于一个不同的包: java.nio.channels.spi。这两个类是 AbstractInterruptibleChannel 和 AbstractSelectableChannel,它们分别为可中断的(interruptible)和可选择的(selectable)的通道实 现提供所需的常用方法。
1.2 打开通道
下面我们尝试创建一个通道,从一个输入流中读取数据然后进行打印。
1.2.1 传统IO方式读取流
在传统IO的情况下,我们的写法如下1
2
3
4
5
6
7
8
9
10
11
12
13public static void main(String[] args) throws IOException {
// 创建数组用于存储读入的输入流数据
final byte[] bytes = new byte[10];
// 创建输入流
final InputStream in = System.in;
while (true) {
int len;
// 将流读入数组中并打印
if ((len = in.read(bytes)) >= 0) {
System.out.println("读取数据: " + new String(bytes, 0, len));
}
}
}
下面是控制台打印情况,可以看到每次可以读取最多是个10个字节的数据然后进行打印。1
2
3
4
5
6
7
8
9
10> hahahaha
读取数据: hahahaha
> this is a long wordddddddddddd!
读取数据: this is a
读取数据: long wordd
读取数据: dddddddddd
读取数据: !
1.2.1 通道方式读取流
但是如果我们使用通道就可以用下面的方式进行1
2
3
4
5
6
7
8
9
10
11
12
13
14
15
16public static void main(String[] args) throws IOException {
// 创建一个Byte缓冲区
final ByteBuffer buffer = ByteBuffer.allocate(10);
// 创建一个可读的通道
final ReadableByteChannel channel = Channels.newChannel(System.in);
while (true) {
// 将通道中的数据读入缓冲区
channel.read(buffer);
// 进行翻转
buffer.flip();
// 将缓冲区的数据进行打印
System.out.println("读取数据: " + new String(buffer.array(), 0, buffer.remaining()));
// 将缓冲区的数据进行清空
buffer.clear();
}
}
下面是控制台打印情况,可以看到每次可以读取最多是个10个字节的数据然后进行打印。1
2
3
4
5
6
7
8
9
10> hahahaha
读取数据: hahahaha
> this is a long wordddddddddddd!
读取数据: this is a
读取数据: long wordd
读取数据: dddddddddd
读取数据: !
从输入输出来看两种方式没有区别,但是,Channel不像流那样是单向的,它就像它的名字一样,一个通道可以从一端走到另一端,也可以从另一端走到这一端,
1.4 Channel拷贝
我们可以自己从两个channel直接读取写入来实现拷贝。
第一种拷贝方式
为了方便理解,我在每次buffer执行前后都打印了当前的位置和上界
1 | public static void main(String[] argv) throws IOException { |
输出如下1
2
3
4
5
6
7
8
9
10
11
12
13
14
15
16
17
18
19
20
21
22> 123
1. postition: 4, limit: 16
2. postition: 0, limit: 4
123
3. postition: 4, limit: 4
4. postition: 0, limit: 16
> 1234567890abcdefghijklmn
1. postition: 16, limit: 16
2. postition: 0, limit: 16
1234567890abcdef
3. postition: 16, limit: 16
4. postition: 0, limit: 16
1. postition: 9, limit: 16
2. postition: 0, limit: 9
ghijklmn
3. postition: 9, limit: 9
4. postition: 0, limit: 16
> ^D
5. postition: 0, limit: 16
6. postition: 0, limit: 0
第二种拷贝方式1
2
3
4
5
6
7
8
9
10
11
12
13
14
15
16public static void main(String[] argv) throws IOException {
final ReadableByteChannel source = Channels.newChannel(System.in);
final WritableByteChannel sink = Channels.newChannel(System.out);
final ByteBuffer buffer = ByteBuffer.allocateDirect(16);
while (source.read(buffer) != -1) {
// 翻转数据,准备读取
buffer.flip();
// 开始写入,因为写入不一定能一次写完,具体要看实现方式,所以此处使用while保证buffer能完全排出
while (buffer.hasRemaining()) {
sink.write(buffer);
}
buffer.clear();
}
source.close();
sink.close();
}
输出如下1
2
3
4
5
6
7
8> 123
123
> 1234567890abcdefghijklmn
1234567890abcdef
ghijklmn
> ^D
上述两种方法的主要区别是什么呢?
第一种方式使用到
compact()方法会牵扯到数据的复制,但是由于它使用了压缩,可以使得write()次数减少(使用压缩可以使每次write的尽可能的多)
第二种方式不会牵扯到数据的复制,但是因为使用轮询排光buffer中的数据后才会进行下一次读取,这样会使得write()次数增多(因为很多时候轮询打印的数据会很少)
1.5 关闭通道
调用通道的close()方法时,可能会导致在通道关闭底层I/O服务的过程中线程暂时阻塞,哪怕该通道处于非阻塞模式。通道关闭时的阻塞行为(如果有的话)是高度取决于操作系统或者文件系统的。在一个通道上多次调用close()方法是没有坏处的,但是如果第一个线程在close()方法中阻塞,那么在它完成关闭通道之前,任何其他调用close()方法都会阻塞。后续在该已关闭的通道上调用close()不会产生任何操作,只会立即返回。
可以通过isOpen()方法来测试通道的开放状态。如果返回true值,那么该通道可以使用。如果返回false值,那么该通道已关闭,不能再被使用。尝试进行任何需要通道处于开放状态作为前提的操作,如读、写等都会导致ClosedChannelException异常。
通道引入了一些与关闭和中断有关的新行为。如果一个通道实现InterruptibleChannel接口,它的行为以下述语义为准:如果一个线程在一个通道上被阻塞并且同时被中断(由调用该被阻塞线程的interrupt()方法的另一个线程中断),那么该通道将被关闭,该被阻塞线程也会产生一个ClosedByInterruptException异常。假设此时A线程被阻塞,此时B线程终端了A线程,此时通道会关闭。
此外,假如一个线程的interrupt status被设置并且该线程试图访问一个通道,那么这个通道将立即被关闭,同时将抛出相同的ClosedByInterruptException异常。线程的interrupt status在线程的interrupt()方法被调用时会被设置。我们可以使用isInterrupted()来测试某个线程当前的interrupt status。当前线程的interrupt status可以通过调用静态的Thread.interrupted()方法清除。
可中断的通道也是可以异步关闭的。实现InterruptibleChannel接口的通道可以在任何时候被关闭,即使有另一个被阻塞的线程在等待该通道上的一个I/O操作完成。当一个通道被关闭时,休眠在该通道上的所有线程都将被唤醒并接收到一个AsynchronousCloseException异常。接着通道就被关闭并将不再可用。
二、Scatter/Gather
2.1 概念介绍
通道提供了一种被称为Scatter/Gather的重要新功能(有时也被称为矢量 I/O),它是指在多个缓冲区上实现一个简单的I/O操作。对于一个write操作而言,数据是从几个缓冲区按顺序抽取(称为 gather)并沿着通道发送的。缓冲区本身并不需要具备这种gather的能力(通常它们也没有此能力)。该gather过程的效果就好比全部缓冲区的内容被连结起来,并在发送数据前存放到一个大的缓冲区中。对于read操作而言,从通道读取的数据会按顺序被散布(称为scatter)到多个缓冲区,将每个缓冲区填满直至通道中的数据或者缓冲区的最大空间被消耗完。
2.2 接口定义
首先我们看一下Scatter/Gather接口分别是什么。他们分别是ScatteringByteChannel和GatheringByteChannel这两个接口。下面是他们的接口代码和依赖关系图1
2
3
4
5
6
7
8
9
10
11
12public interface ScatteringByteChannel extends ReadableByteChannel {
public long read (ByteBuffer [] dsts)
throws IOException;
public long read (ByteBuffer [] dsts, int offset, int length)
throws IOException;
}
public interface GatheringByteChannel extends WritableByteChannel {
public long write(ByteBuffer[] srcs)
throws IOException;
public long write(ByteBuffer[] srcs, int offset, int length)
throws IOException;
}
2.3 函数介绍
我们可以看到两个接口中的方法入参都是BtyeBuffer数组,显然这就是可以对多个ByteBuffer进行操作。
以下面的代码为例1
2
3
4ByteBuffer header = ByteBuffer.allocateDirect(10);
ByteBuffer body = ByteBuffer.allocateDirect(80);
ByteBuffer[] buffers = {header, body};
int bytesRead = channel.read(buffers);
假设我们channel会将48个字节读入buffer中,那header会获取前10个,body获取剩余38个。对写也是同理。
带offset和length参数版本的read()和write()方法使得我们可以使用缓冲区阵列的子集缓冲区。这里的offset值指哪个缓冲区将开始被使用。这里的length参数指示要使用的缓冲区数量。假设我们有一个五元素的buffers阵列,它已经被初始化并引用了五个缓冲区,下面的代码将会写第二个、第三个和第四个缓冲区的内容:1
int bytesRead = channel.write(fiveBuffers, 1, 3);
2.4 使用GatheringByteChannel尝试写文件
下面我们尝试使用GatheringByteChannel来写文件一个代码样例1
2
3
4
5
6
7
8
9
10
11
12
13
14
15
16
17
18
19
20
21
22
23
24
25
26
27
28
29
30
31
32
33
34
35
36
37
38
39
40
41
42
43
44public class Test {
private static final String[] col1 = {"Aggregate", "Enable", "Leverage", "Facilitate", "Synergize", "Repurpose", "Strategize", "Reinvent", "Harness"};
private static final String[] col2 = {"cross-platform", "best-of-breed", "frictionless", "ubiquitous", "extensible", "compelling", "mission-critical", "collaborative", "integrated"};
private static final String[] col3 = {"methodologies", "infomediaries", "platforms", "schemas", "mindshare", "paradigms", "functionalities", "web services", "infrastructures"};
private static final String newline = System.getProperty("line.separator");
private static final Random rand = new Random();
public static void main(String[] argv) throws Exception {
// 定义循环的次数
final int reps = 1;
// 创建写入的文件
final FileOutputStream fileOutputStream = new FileOutputStream("test_1.txt");
final GatheringByteChannel gatherChannel = fileOutputStream.getChannel();
final ByteBuffer[] bs = utterBS(reps);
while (gatherChannel.write(bs) > 0) {
// 空循环直到写完
}
fileOutputStream.close();
}
// 随机生成一些ByteBuffer
private static ByteBuffer[] utterBS(int howMany) throws Exception {
final List<ByteBuffer> list = new ArrayList<>();
for (int i = 0; i < howMany; i++) {
list.add(pickRandom(col1, " "));
list.add(pickRandom(col2, " "));
list.add(pickRandom(col3, newline));
}
final ByteBuffer[] bufs = new ByteBuffer[list.size()];
list.toArray(bufs);
return bufs;
}
// 随机生成ByteBuffer
private static ByteBuffer pickRandom(String[] strings, String suffix) throws Exception {
final String string = strings[rand.nextInt(strings.length)];
int total = string.length() + suffix.length();
final ByteBuffer buf = ByteBuffer.allocate(total);
buf.put(string.getBytes(StandardCharsets.UTF_8));
buf.put(suffix.getBytes(StandardCharsets.UTF_8));
buf.flip();
return buf;
}
}
三、文件通道FileChannel
3.1 FileChannel简介
首先我们看一下FileChannel类的继承依赖关系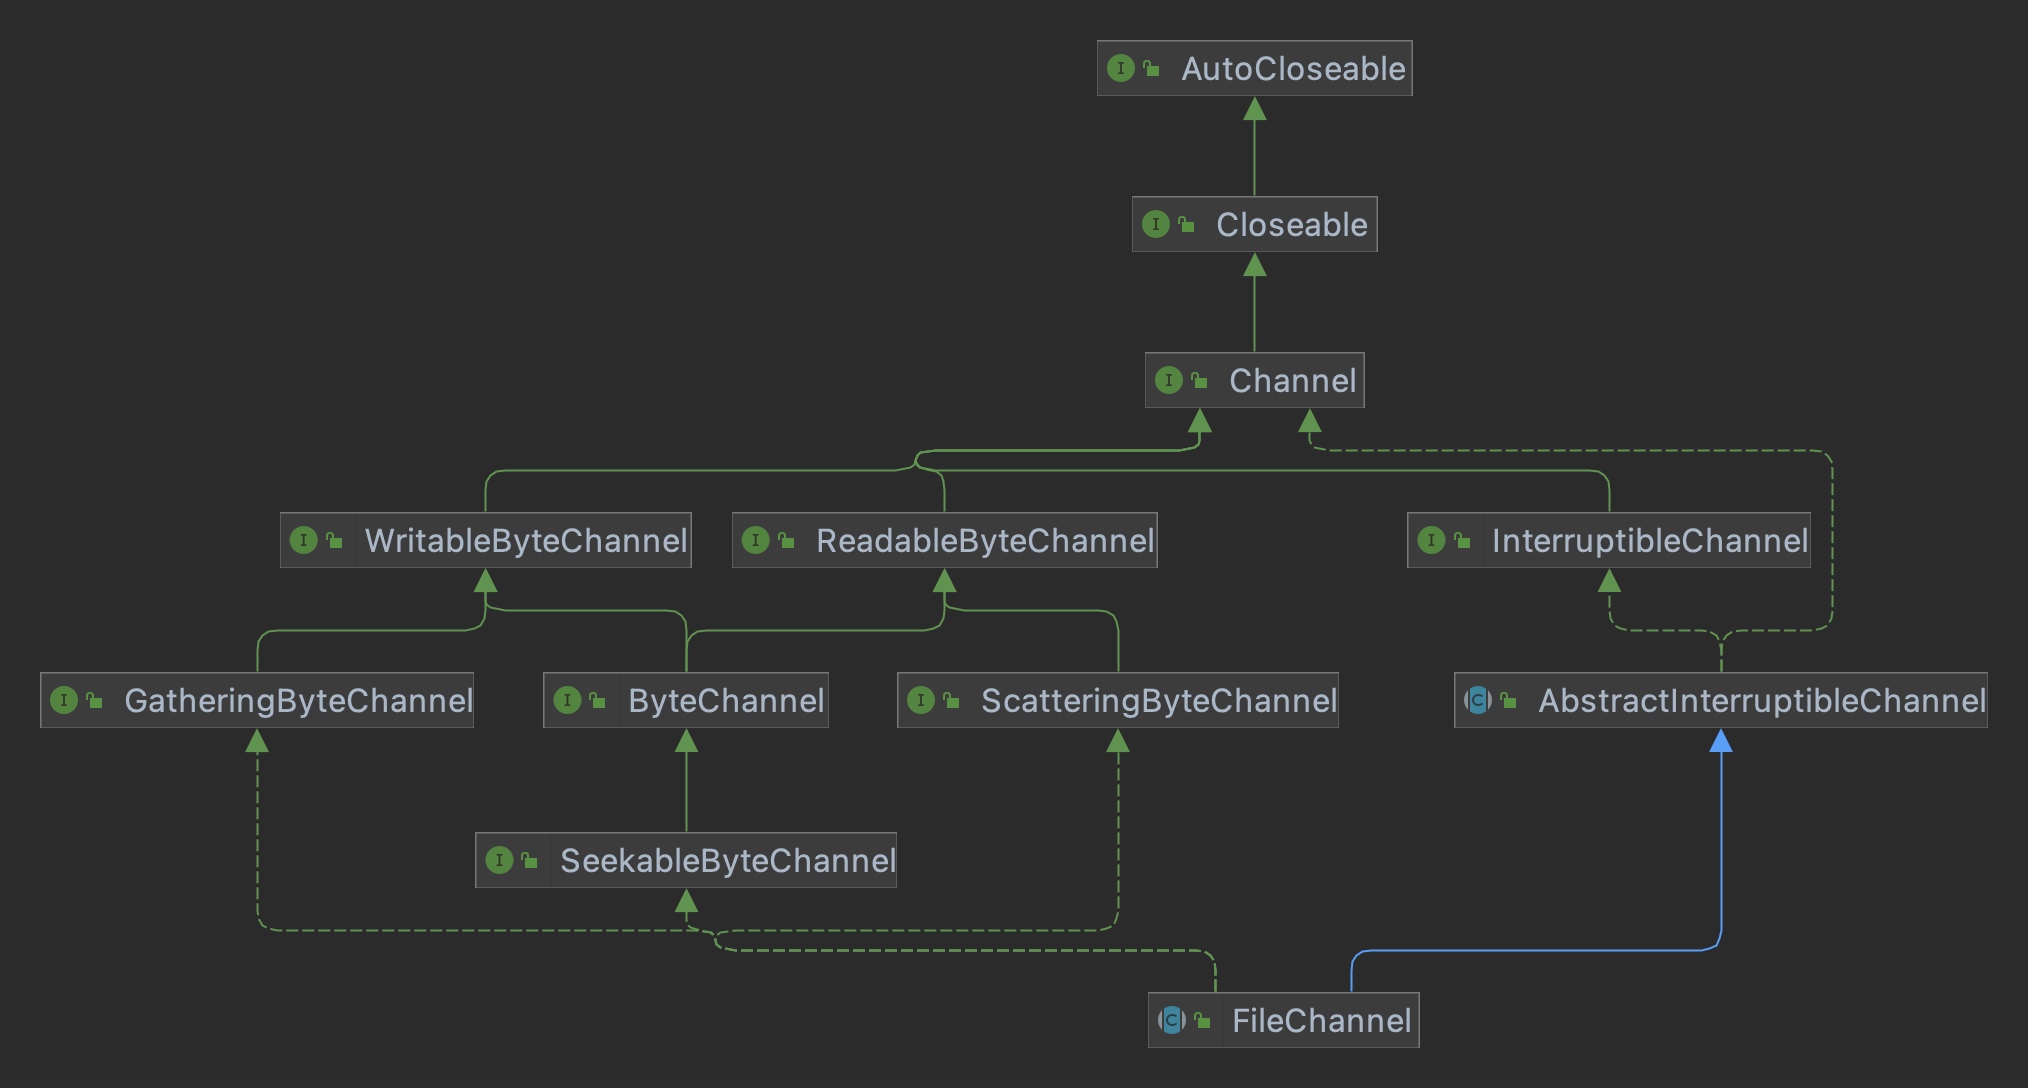
3.1.1 FileChannel是否是阻塞的?
文件通道总是阻塞式的,因此不能被置于非阻塞模式。现代操作系统都有复杂的缓存和预取机 制,使得本地磁盘 I/O 操作延迟很少。网络文件系统一般而言延迟会多些,不过却也因该优化而受 益。面向流的 I/O 的非阻塞范例对于面向文件的操作并无多大意义,这是由文件 I/O 本质上的不同 性质造成的。
3.1.2 FileInputStream与FileOutputStream获取的文件通道的区别?
我们知道在打开文件时我们可以以不同的权限打开。从FileInputStream对象中的getChannel()方法获取的FileChannel对象是只读的。从FileOutputStream对象中的getChannel()方法获取的FileChannel对象是只写的,虽然FileChannel类本身是双向的,但是实际进行写和读操作的时候分别会报NonWritableChannelException和NonReadableChannelException。
3.1.3 FileChannel的position
FileChannel 位置(position)是从底层的文件描述符获得的,该 position 同时被作为通道引用 获取来源的文件对象共享。这也就意味着一个对象对该 position 的更新可以被另一个对象看到:1
2
3
4
5
6
7
8
9
10
11
12
13
14
15RandomAccessFile randomAccessFile = new RandomAccessFile("filename", "r");
// Set the file position
randomAccessFile.seek(1000);
// Create a channel from the file
FileChannel fileChannel = randomAccessFile.getChannel();
// This will print "1000"
System.out.println ("file pos: " + fileChannel.position());
// Change the position using the RandomAccessFile object
randomAccessFile.seek(500);
// This will print "500"
System.out.println ("file pos: " + fileChannel.position());
// Change the position using the FileChannel object
fileChannel.position(200);
// This will print "200"
System.out.println ("file pos: " + randomAccessFile.getFilePointer());
3.1.4 FileChannel多线程访问一个文件会出现问题吗?
多个线程可以并发访问同一个文件而不会相互产生干扰。这是因为每次调用都是原子性的(atomic),并不依靠调用之间系统所记住的状态。
3.1.5 FileChannel比较重要的方法有哪些?
1 | // 文件截断 |
3.2 传统方式读写文件
下面我们先用传统IO的方式来进行文件的读写1
2
3
4
5
6
7
8
9
10
11
12
13public static void main(String[] args) {
final String fileName = "test.txt";
try (FileOutputStream outputStream = new FileOutputStream(fileName)){
outputStream.write("this is a word".getBytes(StandardCharsets.UTF_8));
outputStream.flush();
final FileInputStream inputStream = new FileInputStream(fileName);
final byte[] bytes = new byte[inputStream.available()];
inputStream.read(bytes);
System.out.println(new String(bytes));
} catch (IOException e) {
e.printStackTrace();
}
}
3.3 FileChannel读文件
从文件中读取数据1
2
3
4
5
6
7
8
9
10
11public static void main(String[] args) throws IOException {
final String fileName = "test.txt";
final FileInputStream inputStream = new FileInputStream(fileName);
final FileChannel channel = inputStream.getChannel();
final ByteBuffer buffer = ByteBuffer.allocate(10);
while (channel.read(buffer) >= 0) {
buffer.flip();
System.out.println("读取数据: " + new String(buffer.array(), 0, buffer.remaining()));
buffer.clear();
}
}
这个时候如果我们尝试写数据会发现1
2
3
4
5
6public static void main(String[] args) throws IOException {
final String fileName = "test.txt";
final FileInputStream inputStream = new FileInputStream(fileName);
final FileChannel channel = inputStream.getChannel();
channel.write(ByteBuffer.wrap("this is new word".getBytes(StandardCharsets.UTF_8)));
}
抛出异常1
2
3Exception in thread "main" java.nio.channels.NonWritableChannelException
at sun.nio.ch.FileChannelImpl.write(FileChannelImpl.java:201)
at xyz.suiwo.nio.FileOutputStreamFileChannelTest.main(FileOutputStreamFileChannelTest.java:29)
3.4 FileChannel写文件
下面我们尝试一下写文件1
2
3
4
5
6public static void main(String[] args) throws IOException {
final String fileName = "test.txt";
final FileOutputStream outputStream = new FileOutputStream(fileName);
final FileChannel channel = outputStream.getChannel();
channel.write(ByteBuffer.wrap("this is new word".getBytes(StandardCharsets.UTF_8)));
}
同理假设我们尝试对一个输出流获取到的通道尝试读取的时候也会抛出异常1
2
3
4
5
6
7
8
9
10
11public static void main(String[] args) throws IOException {
final String fileName = "test.txt";
final FileOutputStream outputStream = new FileOutputStream(fileName);
final FileChannel channel = outputStream.getChannel();
final ByteBuffer buffer = ByteBuffer.allocate(10);
while (channel.read(buffer) >= 0) {
buffer.flip();
System.out.println("读取数据: " + new String(buffer.array(), 0, buffer.remaining()));
buffer.clear();
}
}
异常如下1
2
3Exception in thread "main" java.nio.channels.NonReadableChannelException
at sun.nio.ch.FileChannelImpl.read(FileChannelImpl.java:149)
at xyz.suiwo.nio.FileOutputStreamFileChannelTest.main(FileOutputStreamFileChannelTest.java:39)
3.5 创建同时可读可写的FileChannel
既然FileChannel是双向的,那我们有办法能创建一个可读可写的通道吗?
答案是可以的我们可以通过RandomAccessFile来获取通道,我们观察一下RandomAccessFile类的继承实现情况
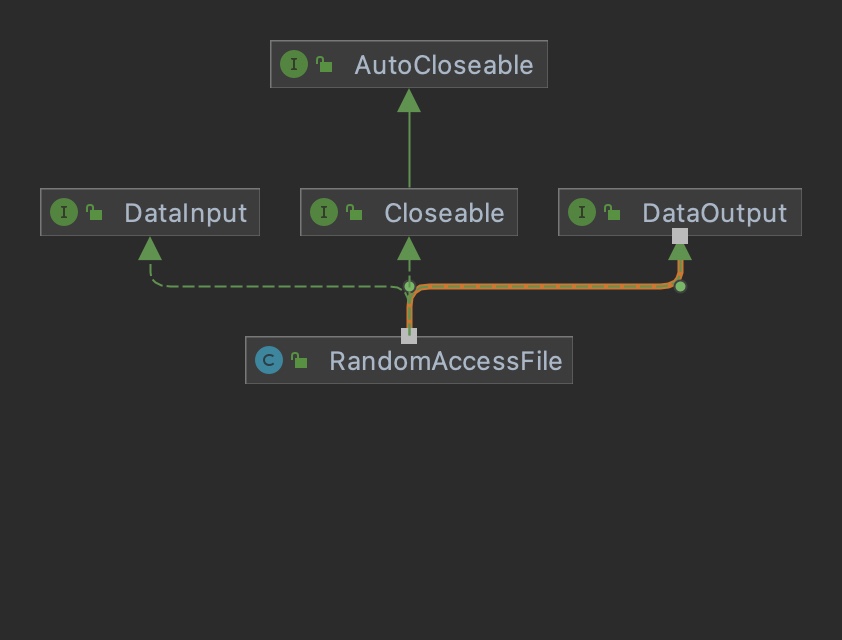
会发现他同时实现了DataOutput, DataInput两个接口,来实现我们的可读可写
下面我们来尝试创建一个可读可写的通道1
2
3
4
5
6
7
8
9
10
11
12
13
14
15
16
17
18public static void main(String[] args) {
try (final RandomAccessFile randomAccessFile = new RandomAccessFile("test.txt", "rw");) {
final FileChannel channel = randomAccessFile.getChannel();
channel.write(ByteBuffer.wrap("this is an old word".getBytes(StandardCharsets.UTF_8)));
// 如果不对位置进行归0,那我们读取的时候就会从当前的channel.position()开始读取
System.out.println("完成写操作后当前的通道位置为: " + channel.position());
// 需要将通道的位置归0,这样我们才能从开头开始读取数据
channel.position(0);
final ByteBuffer buffer = ByteBuffer.allocate(10);
while (channel.read(buffer) >= 0) {
buffer.flip();
System.out.println("读取数据: " + new String(buffer.array(), 0, buffer.remaining()));
buffer.clear();
}
} catch (IOException e) {
e.printStackTrace();
}
}
3.6 FileChannel截断
我们也可以使用truncate(int)方法来对文件进行截断1
2
3
4
5
6
7
8
9
10
11
12
13
14
15
16
17public static void main(String[] args) {
try (final RandomAccessFile randomAccessFile = new RandomAccessFile("test.txt", "rw");) {
final FileChannel channel = randomAccessFile.getChannel();
// 执行完这一行此时文件中的内容变成 'this is an old word'
channel.write(ByteBuffer.wrap("this is an old word".getBytes(StandardCharsets.UTF_8)));
// 执行完这一行此时文件中的内容变成 'this' 说明已经成功截断
channel.truncate(4);
final ByteBuffer buffer = ByteBuffer.allocate(10);
while (channel.read(buffer) >= 0) {
buffer.flip();
System.out.println("读取数据: " + new String(buffer.array(), 0, buffer.remaining()));
buffer.clear();
}
} catch (IOException e) {
e.printStackTrace();
}
}
3.7 FileChannel编辑
在我们尝试对一个文件进行编辑的时候,可以使用MappedByteBuffer类(这个类的详细我们会在后续讲解)来讲数据映射到内存中进行编辑,编辑结束后将编辑的内容同步到文件中。1
2
3
4
5
6
7
8
9
10
11
12
13
14
15
16
17
18
19
20
21
22
23
24
25
26
27
28
29
30
31public static void main(String[] args) {
try(final RandomAccessFile f = new RandomAccessFile("test.txt", "rw");
final FileChannel channel = f.getChannel()){
/**
* 这里需要使用MapMode.READ_WRITE模式,其他模式无法保存数据到文件
* 假设我们的原文是 'this is a new word',我们接下来尝试从第2个字节开始,映射4个字节到内存中。
* 如果设置的映射字节数大于本来文件中的剩余字节长度,多出来的部分将会填空字节
*/
final MappedByteBuffer buffer = channel.map(FileChannel.MapMode.READ_WRITE, 2, 4);
/**
* 我们可以直接对在内存中的数据进行编辑,也就是编辑Buffer中的内容
* 注意这里写入也是从pos位置开始的,我们当前的开始编辑的位置是第2个字节,但是我们的position当前为0
* 由于我们映射的字节大小为4,假设这个时候我们写入5个字节则会抛出以下异常
* Exception in thread "main" java.nio.BufferOverflowException
* at java.nio.ByteBuffer.put(ByteBuffer.java:829)
* at java.nio.DirectByteBuffer.put(DirectByteBuffer.java:376)
* at java.nio.ByteBuffer.put(ByteBuffer.java:859)
* at xxx.xxx.main(Xxxx.java:30)
*
* 在我们执行完put后只是修改了内存中的数据,文件此时并未进行变更
*/
buffer.put("abcd".getBytes());
// 执行完force()方法,此时文件完成编辑,文件内容变成 'thabcds a new word'
buffer.force();
} catch (IOException e) {
e.printStackTrace();
}
}
3.8 FileChannel拷贝(Channel To Channel)
对于FileChannel我们可以使用transferTo()和transferFrom()方法
下面我们尝试从从一个输出流的通道拷贝到输入流的通道中1
2
3
4
5
6
7
8
9
10
11
12
13
14// 假设此时test.txt中存在一份文本,执行结束后会发现成功拷贝到test2.txt文件中
public static void main(String[] args) {
try (final FileOutputStream out = new FileOutputStream("test2.txt");
final FileInputStream in = new FileInputStream("test.txt")) {
final FileChannel inChannel = in.getChannel(); //获取到test文件的通道
// 第一个参数是开始拷贝的起始位置,第二个参数表示拷贝的数量
// 将test文件通道中的数据拷贝到test2文件的通道中
inChannel.transferTo(0, inChannel.size(), out.getChannel());
// 下面这行代码的执行效果与上面一行一直
// out.getChannel().transferFrom(inChannel, 0, inChannel.size());
} catch (IOException e) {
e.printStackTrace();
}
}
3.9 文件锁定
文件锁分为共享锁和独占锁,而这种锁的具体实现很大程度上都依赖本地操作系统的实现、所以假设某个操作系统和文件系统不支持共享文件锁,那么对于一个共享所得请求会被自动提升为独占锁,这回暗中的影响性能,所以在使用前一定要对操作系统和文件系统的文件锁定行为有详细的认识。
同时我们要注意,
FileChannel锁实现的文件锁定模型锁的对象是文件而不是通道或者线程,这意味着文件锁的判定是服务的进程粒度下的,对于多线程并不适用。
3.9.1 文件锁定相关的API
1 | public abstract class FileChannel extends AbstractChannel implements ByteChannel, GatheringByteChannel, ScatteringByteChannel { |
如果您正请求的锁定范围是有效的,那么lock()方法会阻塞,它必须等待前面的锁被释放。假如您的线程在此情形下被暂停,该线程的行为受中断语义控制。如果通道被另外一个线程关闭,该暂停线程将恢复并产生一个AsynchronousCloseException异常。假如该暂停线程被直接中断(通过调用它的interrupt()方法),它将醒来并产生一个FileLockInterruptionException异常。如果在调用lock()方法时线程的interrupt status已经被设置,也会产生FileLockInterruptionException异常。
3.9.2 FileLock介绍
首先我们看一下FileLock类的重要方法1
2
3
4
5
6
7
8
9
10
11
12
13
14
15
16public abstract class FileLock implements AutoCloseable {
// 获取当前锁对应的文件通道
public final FileChannel channel( )
// 获取当前锁的文件位置
public final long position( )
// 获取锁文件的大小
public final long size( )
// 返回当前锁是否为共享锁
public final boolean isShared( )
// 返回从position-size的锁是否和当前所重合
public final boolean overlaps (long position, long size)
// 告知此锁是否有效。锁定对象在释放或关联的文件通道关闭(以先到者为准)之前一直有效。
public abstract boolean isValid( );
// 释放当前锁
public abstract void release( ) throws IOException;
}
尽管一个FileLock对象是与某个特定的FileChannel实例关联的,它所代表的锁却是与一个底层文件关联的,而不是与通道关联。因此,如果您在使用完一个锁后而不释放它的话,可能会导致冲突或者死锁。请小心管理文件锁以避免出现此问题。一旦您成功地获取了一个文件锁,如果随后在通道上出现错误的话,请务必释放这个锁。
下面是推荐使用的方法1
2
3
4
5
6
7try (final RandomAccessFile randomAccessFile = new RandomAccessFile("test.txt", "rw");
final FileChannel channel = randomAccessFile.getChannel();
final FileLock lock = channel.lock()) {
// lock code
} catch (IOException e) {
e.printStackTrace();
}
3.9.3 尝试进程间使用文件锁
1 | public static void main(String[] args) throws FileNotFoundException { |
我们同时启动两个实例,此时可以在控制台看到在第一个实例释放锁喉第二个实例才获取到锁1
2
3
4
5
6
7
8
9# 控制台1
Sun Jan 15 15:57:22 CST 2023 正在尝试获取文件锁...
Sun Jan 15 15:57:22 CST 2023 已获取到文件锁!
Sun Jan 15 15:57:27 CST 2023 操作完毕,释放文件锁!
# 控制台2
Sun Jan 15 15:57:24 CST 2023 正在尝试获取文件锁...
Sun Jan 15 15:57:27 CST 2023 已获取到文件锁!
Sun Jan 15 15:57:32 CST 2023 操作完毕,释放文件锁!
这是如果我们修改lock方式对同一个文件的不同位置进行上锁就会发现,两个进程不会阻塞对方。
四、内存映射文件
在FileChannel中提供了一个map()方法,这个方法是可以在一个打开的文件和一个特殊的ByteBuffer之间建立一个虚拟内存映射。在FileChannel上调用map()方法会创建一个由磁盘文件支持的虚拟内存映射(virtual memory mapping)并在那块虚拟内存空间外部封装一个MappedByteBuffer对象。如下图
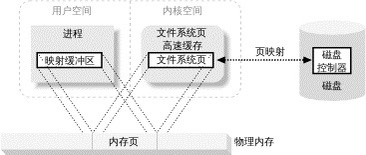
通过内存映射机制来访问一个文件会比使用常规方法读写高效得多,甚至比使用通道的效率都高。因为不需要做明确的系统调用,那会很消耗时间。更重要的是,操作系统的虚拟内存可以自动缓存内存页(memory page)。这些页是用系统内存来缓存的,所以不会消耗Java虚拟机内存堆(memory heap)。
4.1 map()方法定义
1 | public abstract class FileChannel extends AbstractChannel implements ByteChannel, GatheringByteChannel, ScatteringByteChannel { |
首先我们尝试映射100到299位置的字节,代码如下1
buffer = fileChannel.map(FileChannel.MapMode.READ_ONLY, 100, 200);
尝试映射整个文件1
buffer = fileChannel.map(FileChannel.MapMode.READ_ONLY, 0, fileChannel.size());
4.1.1 MapMode介绍
MapMode.READ_ONLY 和 MapMode.READ_WRITE 意义是很明显的,它们表示您希望获取的映射只读还是允许修改映射的文件。请求的映射模式将受被调用map( )方法的 FileChannel 对象的访问权限所限制。如果通道是以只读的权限打开的而您却请求 MapMode.READ_WRITE 模式,那么 map( )方法会抛出一个 NonWritableChannelException 异常;如果您在一个没有读权限的通道上请求 MapMode.READ_ONLY 映射模式,那么将产生 NonReadableChannelException 异常。不过在以 read/write 权限打开的通道上请求一个 MapMode.READ_ONLY 映射却是允许的。MappedByteBuffer 对象的可变性可以通过对它调用 isReadOnly( )方法来检查。
MapMode.PRIVATE 表示您想要一个写时拷贝(copy-on-write)的映射。这意味着 您通过 put( )方法所做的任何修改都会导致产生一个私有的数据拷贝并且该拷贝中的数据只有 MappedByteBuffer 实例可以看到。该过程不会对底层文件做任何修改,而且一旦缓冲区被施以垃圾 收集动作(garbage collected),那些修改都会丢失。尽管写时拷贝的映射可以防止底层文件被修 改,您也必须以 read/write 权限来打开文件以建立 MapMode.PRIVATE 映射。只有这样,返回的 MappedByteBuffer 对象才能允许使用 put( )方法。
下面我们对三种类型的MappedByteBuffer进行读写看看互相的影响,各种模式的内存映射如何交互。1
2
3
4
5
6
7
8
9
10
11
12
13
14
15
16
17
18
19
20
21
22
23
24
25
26
27
28
29
30
31
32
33
34
35
36
37
38
39
40
41
42
43
44
45
46
47
48
49
50
51
52
53
54
55
56
57
58
59
60
61
62
63
64
65
66
67
68
69
70
71
72
73
74
75
76
77
78
79
80
81
82
83
84
85
86
87
88
89
90
91
92
93
94
95
96
97
98
99
100
101
102
103
104
105
106
107
108
109
110
111
112
113
114
115
116
117
118
119
120
121
122
123
124
125
126
127public static void main(String[] argv) throws Exception {
// 创建临时文件
final File tempFile = File.createTempFile("mmaptest", null);
try (final RandomAccessFile file = new RandomAccessFile(tempFile, "rw");
final FileChannel channel = file.getChannel()){
final ByteBuffer temp = ByteBuffer.allocate(100);
temp.put("This is the file content".getBytes());
temp.flip();
channel.write(temp, 0);
temp.clear();
temp.put("This is more file content".getBytes());
temp.flip();
// 中间部分都是空
channel.write(temp, 8192);
// 分别创建只读,读写和copy-on-write的MappedByteBuffer
final MappedByteBuffer ro = channel.map(FileChannel.MapMode.READ_ONLY, 0, channel.size());
final MappedByteBuffer rw = channel.map(FileChannel.MapMode.READ_WRITE, 0, channel.size());
final MappedByteBuffer cow = channel.map(FileChannel.MapMode.PRIVATE, 0, channel.size());
System.out.println("Begin");
/**
* 此时三种方式的MappedByteBuffer的输出分别是
*
* R/O: 'This is the file content|[8168 nulls]|This is more file content'
* R/W: 'This is the file content|[8168 nulls]|This is more file content'
* COW: 'This is the file content|[8168 nulls]|This is more file content'
*/
showBuffers(ro, rw, cow);
cow.position(8);
cow.put("COW".getBytes());
System.out.println("Change to COW buffer");
/**
* 此时三种方式的MappedByteBuffer的输出分别是
*
* R/O: 'This is the file content|[8168 nulls]|This is more file content'
* R/W: 'This is the file content|[8168 nulls]|This is more file content'
* COW: 'This is COW file content|[8168 nulls]|This is more file content'
*/
showBuffers(ro, rw, cow);
rw.position(9);
rw.put(" R/W ".getBytes());
rw.position(8194);
rw.put(" R/W ".getBytes());
rw.force();
System.out.println("Change to R/W buffer");
/**
* 此时三种方式的MappedByteBuffer的输出分别是
*
* R/O: 'This is t R/W le content|[8168 nulls]|Th R/W more file content'
* R/W: 'This is t R/W le content|[8168 nulls]|Th R/W more file content'
* COW: 'This is COW file content|[8168 nulls]|This is more file content'
*/
showBuffers(ro, rw, cow);
// Write to the file through the channel; hit both pages
temp.clear();
temp.put("Channel write ".getBytes());
temp.flip();
channel.write(temp, 0);
temp.rewind();
channel.write(temp, 8202);
System.out.println("Write on channel");
/**
* 此时三种方式的MappedByteBuffer的输出分别是
*
*
* R/O: 'Channel write le content|[8168 nulls]|Th R/W moChannel write t'
* R/W: 'Channel write le content|[8168 nulls]|Th R/W moChannel write t'
* COW: 'This is COW file content|[8168 nulls]|This is more file content'
*/
showBuffers(ro, rw, cow);
// Modify the copy-on-write buffer again
cow.position(8207);
cow.put(" COW2 ".getBytes());
System.out.println("Second change to COW buffer");
/**
* 此时三种方式的MappedByteBuffer的输出分别是
*
* R/O: 'Channel write le content|[8168 nulls]|Th R/W moChannel write t'
* R/W: 'Channel write le content|[8168 nulls]|Th R/W moChannel write t'
* COW: 'This is COW file content|[8168 nulls]|This is more fi COW2 tent'
*/
showBuffers(ro, rw, cow);
// Modify the read/write buffer
rw.position(0);
rw.put(" R/W2 ".getBytes());
rw.position(8210);
rw.put(" R/W2 ".getBytes());
rw.force();
System.out.println("Second change to R/W buffer");
/**
* 此时三种方式的MappedByteBuffer的输出分别是
*
* R/O: ' R/W2 l write le content|[8168 nulls]|Th R/W moChannel R/W2 t'
* R/W: ' R/W2 l write le content|[8168 nulls]|Th R/W moChannel R/W2 t'
* COW: 'This is COW file content|[8168 nulls]|This is more fi COW2 tent'
*/
showBuffers(ro, rw, cow);
}
tempFile.delete();
}
// 对三种形式的ByteBuffer进行打印
public static void showBuffers(ByteBuffer ro, ByteBuffer rw, ByteBuffer cow) throws Exception {
dumpBuffer("R/O", ro);
dumpBuffer("R/W", rw);
dumpBuffer("COW", cow);
System.out.println("");
}
// 打印ByteBuffer中的内容
public static void dumpBuffer(String prefix, ByteBuffer buffer) throws Exception {
System.out.print(prefix + ": '");
int nulls = 0;
int limit = buffer.limit();
for (int i = 0; i < limit; i++) {
char c = (char) buffer.get(i);
if (c == '\u0000') {
nulls++;
continue;
}
if (nulls != 0) {
System.out.print("|[" + nulls + " nulls]|");
nulls = 0;
}
System.out.print(c);
}
System.out.println("'");
}
4.2 MappedByteBuffer介绍
首先我们看一下MappedByteBuffer和其他ByteBuffer相比不同的方法1
2
3
4
5
6
7
8
9public abstract class MappedByteBuffer extends ByteBuffer {
// load( )方法会加载整个文件以使它常驻内存。
public final MappedByteBuffer load()
// 我们可以通过调用 isLoaded()方法来判断一个被映射的文件是否完全常驻内存了。如果该方法返回 true 值,那么很大概率是映射缓冲区的访问延迟很少或者根本没有延迟。不过,这也是不能保证的。
public final boolean isLoaded()
// 强制将对此缓冲区内容所做的任何更改写入包含映射文件的存储设备。
// 如果映射是以 MapMode.READ_ONLY 或 MAP_MODE.PRIVATE 模式建立的,那么调用 force() 方法将不起任何作用,因为永远不会有更改需要应用到磁盘上(但是这样做也是没有害处的)。
public final MappedByteBuffer force()
}
五、Socket通道
5.1 阻塞I/O的socket实现
在学习Socket通道之前我们先重温一下,在JAVA传统的阻塞I/O中Socket通信是如何实现的
服务端代码1
2
3
4
5
6
7
8
9
10
11
12
13
14
15public static void main(String[] args) {
try (final ServerSocket server = new ServerSocket(8080)) {
System.out.println("等待客户端连接。。。。");
final Socket socket = server.accept();
System.out.println("客户端已连接,IP地址为: " + socket.getInetAddress().getHostAddress());
final BufferedReader reader = new BufferedReader(new InputStreamReader(socket.getInputStream()));
System.out.println("开始接收客户端消息。。。。");
System.out.println("收到客户端请求: " + reader.readLine());
final OutputStreamWriter writer = new OutputStreamWriter(socket.getOutputStream());
writer.write("已收到,服务端IP为: " + server.getInetAddress().getHostAddress());
writer.flush();
} catch (IOException e) {
e.printStackTrace();
}
}
客户端代码1
2
3
4
5
6
7
8
9
10
11
12
13
14
15
16public static void main(String[] args) {
try (final Socket socket = new Socket("localhost", 8080);
final Scanner scanner = new Scanner(System.in)) {
System.out.println("已连接到服务端!");
final OutputStreamWriter writer = new OutputStreamWriter(socket.getOutputStream());
System.out.print("请输入要发送的数据 > ");
final String text = scanner.nextLine();
writer.write(text + "\n");
writer.flush();
final BufferedReader reader = new BufferedReader(new InputStreamReader(socket.getInputStream()));
final String line = reader.readLine();
System.out.println("收到服务端返回: " + line);
} catch (IOException e) {
e.printStackTrace();
}
}
输出日志如下1
2
3
4
5
6
7
8
9
10# 服务端日志
等待客户端连接。。。。
客户端已连接,IP地址为: 127.0.0.1
开始接收客户端消息。。。。
收到客户端请求: hello socket server
# 客户端日志
已连接到服务端!
请输入要发送的数据 > hello socket server
收到服务端返回: 已收到,服务端IP为: 0.0.0.0
5.2 非阻塞I/O的实现
服务端1
2
3
4
5
6
7
8
9
10
11
12
13
14
15
16
17
18public static void main(String[] args) {
try (final ServerSocketChannel server = ServerSocketChannel.open()) {
System.out.println("等待客户端连接。。。。");
server.bind(new InetSocketAddress(8080));
final SocketChannel socket = server.accept();
System.out.println("客户端已连接,IP地址为: " + socket.getRemoteAddress());
final ByteBuffer buffer = ByteBuffer.allocate(128);
socket.read(buffer);
buffer.flip();
final String text = new String(buffer.array(), 0, buffer.remaining());
System.out.println("接收到客户端消息: " + text);
buffer.clear();
socket.write(ByteBuffer.wrap(("已收到消息,当前服务IP为: " + server.getLocalAddress().toString()).getBytes(StandardCharsets.UTF_8)));
socket.close();
} catch (IOException e) {
e.printStackTrace();
}
}
客户端1
2
3
4
5
6
7
8
9
10
11
12
13
14
15
16public static void main(String[] args) {
try (final SocketChannel socket = SocketChannel.open(new InetSocketAddress("localhost", 8080)); final Scanner scanner = new Scanner(System.in)) {
System.out.println("已连接到服务端!");
System.out.print("请输入要发送的数据 > ");
final String text = scanner.nextLine();
socket.write(ByteBuffer.wrap(text.getBytes(StandardCharsets.UTF_8)));
final ByteBuffer buffer = ByteBuffer.allocate(128);
System.out.println("收到服务端返回: ");
socket.read(buffer);
buffer.flip();
System.out.println(new String(buffer.array(), 0, buffer.remaining()));
buffer.clear();
} catch (IOException e) {
e.printStackTrace();
}
}
输出日志如下1
2
3
4
5
6
7
8
9
10
11
12
13
14# 服务端日志
Connected to the target VM, address: '127.0.0.1:54206', transport: 'socket'
等待客户端连接。。。。
客户端已连接,IP地址为: /127.0.0.1:54216
接收到客户端消息: haha
Disconnected from the target VM, address: '127.0.0.1:54206', transport: 'socket'
# 客户端日志
Connected to the target VM, address: '127.0.0.1:54214', transport: 'socket'
已连接到服务端!
请输入要发送的数据 > haha
收到服务端返回:
已收到消息,当前服务IP为: /0:0:0:0:0:0:0:0:8080
Disconnected from the target VM, address: '127.0.0.1:54214', transport: 'socket'
5.3 Socket通道常用类介绍
- Socket通道类有三个,分别是
SocketChannle,ServerSocketChannel和DatagramChannel。这三个通道都是由AbstractSelectableChannel类引申而来。这意味着我们可以使用一个Selector对象来执行有条件的选择。 - 当我们实例化
DatagramChannel,SocketChannel,ServerSocketChannel后,会发现都可以通过socket()方法获取我们所熟悉的java.net包下的对等对象DatagramSocket,Socket,ServerSocket。通过通过对等的socket的getChannel()方法我们也可以获取到他所关联的通道。当然并非所有的socket都可以获取的对应的channel,当我们使用传统方式实例化一个Socket对象是,此时调用getChannel()返回将为null。 - 通过继承关系我们会发现
DatagramChannel和SocketChannel实现定义读和写功能的接口而ServerSocketChannel不实现。ServerSocketChannel负责监听传入的连接和创建新的SocketChannel对象,它本身从不传输数据。
5.3.1 非阻塞模式
传统的Java Socket的阻塞曾是Java程序可伸缩性的重要制约之一。非阻塞I/O是许多复杂、高性能的程序构建的基础。要把一个Socket通道置于非阻塞模式,我们要依靠所有Socket通道类的共有超级类SelectableChannel。
下面我们对SelectableChannel进行分析。
我们本章只看和阻塞相关的方法,剩余的方法将会在降到选择器的时候再进行介绍。1
2
3
4
5
6
7
8public abstract class SelectableChannel extends AbstractChannel implements Channel {
// 调整此通道的阻塞模式。
public abstract void configureBlocking (boolean block) throws IOException;
// 获取当前block状态
public abstract boolean isBlocking();
// 获取锁对象
public abstract Object blockingLock();
}
下面我们尝试shi用伪代码来实现修改阻塞模式,判断阻塞默认然后执行对应的操作的行为。1
2
3
4
5
6
7
8
9SocketChannel sc = SocketChannel.open();
// 设置为非阻塞
sc.configureBlocking(false);
// doSomething (cs);
if (!sc.isBlocking()) {
// doSomething (cs);
}
有的时候我们也需要避免执行部分代码的时候socket通道的阻塞模式被修改,这个时候我们可以使用blockingLock()方法,该方法会返回一个非透明的对象引用。通过对这个对象上锁,防止其他线程对阻塞模式的修改。对于确保在执行代码的关键部分时socket通道的阻塞模式不会改变以及在不影响其他线程的前提下暂时改变阻塞模式来说,这个方法都是非常方便的。
1 | Socket socket = null; |
5.4 ServerSocketChannel
5.4.1 ServerSocketChannel类方法介绍
首先我们看一下ServerSocketChannel的完成方法1
2
3
4
5
6
7
8
9
10
11
12
13
14
15
16
17
18
19
20
21
22
23
24
25
26
27
28
29
30
31
32
33
34
35
36
37
38public abstract class ServerSocketChannel extends AbstractSelectableChannel implements NetworkChannel {
// 启动一个ServerSocket通道
public static ServerSocketChannel open() throws IOException {
return SelectorProvider.provider().openServerSocketChannel();
}
// 返回标识此通道支持的操作的操作集。
public final int validOps() {
return SelectionKey.OP_ACCEPT;
}
// -- 下面是ServerSocket特有的一些方法 --
// 将当前通道绑定到一个本地端口地址,backlog是最大连接数,如果backlog参数的值为0或负值,则使用特定于实现的默认值。
public final ServerSocketChannel bind(SocketAddress local)
throws IOException {
return bind(local, 0);
}
// 将当前通道绑定到一个本地端口地址,backlog是最大连接数,如果backlog参数的值为0或负值,则使用特定于实现的默认值。
public abstract ServerSocketChannel bind(SocketAddress local, int backlog)
throws IOException;
// 设置参数
public abstract <T> ServerSocketChannel setOption(SocketOption<T> name, T value)
throws IOException;
// 获取当前通道的对应java.net的socket对象
public abstract ServerSocket socket();
// 接受一个当前通道的Socket连接
public abstract SocketChannel accept() throws IOException;
// 返回此通道的套接字所绑定的套接字地址。
public abstract SocketAddress getLocalAddress() throws IOException;
}
5.4.2 实现非阻塞的ServerSocketChannel
当我们打开了一个通道并且完成了端口服务绑定,就可以通过accept()方法来获取一个socket。同时返回的socket对象可以在非阻塞模式下运行。
如果ServerSocketChannel是以非阻塞模式被调用,ServerSocketChannel.accept()会立即返回 null。正是这种检查连接而不阻塞的能力实现了可伸缩性并降低了复杂性。可选择性也因此得到实现。我们可以使用一个选择器实例来注册一个ServerSocketChannel对象以实现新连接到达时自动通知的功能。
下面我们来尝试一下非阻塞的accept()方法。
服务端代码1
2
3
4
5
6
7
8
9
10
11
12
13
14
15
16
17
18
19
20
21
22
23
24
25
26
27public static void main(String[] args) {
final SimpleDateFormat format = new SimpleDateFormat("yyyy-MM-dd HH:mm:ss");
try (final ServerSocketChannel server = ServerSocketChannel.open()) {
server.bind(new InetSocketAddress(8080));
server.configureBlocking(false);
final ByteBuffer buffer = ByteBuffer.allocate(128);
while (true) {
System.out.println("---- 等待客户端连接, 当前时间: " + format.format(new Date()) + " ----\n");
final SocketChannel socket = server.accept();
if (socket == null) {
Thread.sleep(2000);
} else {
System.out.println("客户端进行连接,客户端信息: " + socket.getRemoteAddress().toString());
socket.read(buffer);
buffer.flip();
System.out.println("客户端内容为 > " + new String(buffer.array(), 0, buffer.remaining(), StandardCharsets.UTF_8));
buffer.clear();
final String text = "收到您的请求, 服务器信息如下: " + server.getLocalAddress().toString() + ", 当前接收时间为: " + format.format(new Date());
System.out.println("发送消息到客户端,消息内容为 > " + text + "\n");
socket.write(ByteBuffer.wrap(text.getBytes(StandardCharsets.UTF_8)));
socket.close();
}
}
} catch (IOException | InterruptedException e) {
e.printStackTrace();
}
}
客户端代码1
2
3
4
5
6
7
8
9
10
11
12
13
14
15
16
17
18
19
20
21public static void main(String[] args) throws InterruptedException {
final SimpleDateFormat format = new SimpleDateFormat("yyyy-MM-dd HH:mm:ss");
for (int i = 1; i <= 2; i++) {
System.out.println("------ 创建第 " + i + " 次连接 ------");
try (final SocketChannel socket = SocketChannel.open(new InetSocketAddress("localhost", 8080))) {
final String text = "客户端的第 " + i + " 条消息, 当前发送时间为: " + format.format(new Date());
System.out.print("发送消息到服务端,消息内容为 > " + text);
socket.write(ByteBuffer.wrap(text.getBytes(StandardCharsets.UTF_8)));
final ByteBuffer buffer = ByteBuffer.allocate(128);
System.out.println();
socket.read(buffer);
buffer.flip();
System.out.println("收到服务端返回 > " + new String(buffer.array(), 0, buffer.remaining()));
buffer.clear();
} catch (IOException e) {
e.printStackTrace();
}
System.out.println("------ 断开第 " + i + " 次连接 ------\n");
Thread.sleep(3000);
}
}
输出如下1
2
3
4
5
6
7
8
9
10
11
12
13
14
15
16
17
18
19
20
21
22
23
24
25
26
27
28
29
30
31
32
33
34# 服务端
---- 等待客户端连接, 当前时间: 2023-01-16 15:47:23 ----
---- 等待客户端连接, 当前时间: 2023-01-16 15:47:25 ----
---- 等待客户端连接, 当前时间: 2023-01-16 15:47:27 ----
客户端进行连接,客户端信息: /127.0.0.1:59505
客户端内容为 > 客户端的第 1 条消息, 当前发送时间为: 2023-01-16 15:47:26
发送消息到客户端,消息内容为 > 收到您的请求, 服务器信息如下: /0:0:0:0:0:0:0:0:8080, 当前接收时间为: 2023-01-16 15:47:27
---- 等待客户端连接, 当前时间: 2023-01-16 15:47:27 ----
---- 等待客户端连接, 当前时间: 2023-01-16 15:47:29 ----
---- 等待客户端连接, 当前时间: 2023-01-16 15:47:31 ----
客户端进行连接,客户端信息: /127.0.0.1:59524
客户端内容为 > 客户端的第 2 条消息, 当前发送时间为: 2023-01-16 15:47:30
发送消息到客户端,消息内容为 > 收到您的请求, 服务器信息如下: /0:0:0:0:0:0:0:0:8080, 当前接收时间为: 2023-01-16 15:47:31
---- 等待客户端连接, 当前时间: 2023-01-16 15:47:31 ----
# 客户端
------ 创建第 1 次连接 ------
发送消息到服务端,消息内容为 > 客户端的第 1 条消息, 当前发送时间为: 2023-01-16 15:47:26
收到服务端返回 > 收到您的请求, 服务器信息如下: /0:0:0:0:0:0:0:0:8080, 当前接收时间为: 2023-01-16 15:47:27
------ 断开第 1 次连接 ------
------ 创建第 2 次连接 ------
发送消息到服务端,消息内容为 > 客户端的第 2 条消息, 当前发送时间为: 2023-01-16 15:47:30
收到服务端返回 > 收到您的请求, 服务器信息如下: /0:0:0:0:0:0:0:0:8080, 当前接收时间为: 2023-01-16 15:47:31
------ 断开第 2 次连接 ------
5.5 SocketChannel
5.5.1 SocketChannel类方法介绍
首先我们看一下SocketChannel的类方法1
2
3
4
5
6
7
8
9
10
11
12
13
14
15
16
17
18
19
20
21
22
23
24
25
26
27
28
29
30
31
32
33
34
35
36
37
38
39
40
41
42
43
44
45
46
47
48
49
50
51
52
53
54
55
56
57
58
59
60
61
62
63
64
65
66
67
68
69
70
71
72
73
74
75
76
77
78
79
80
81
82
83
84
85
86
87
88
89
90
91
92
93
94
95
96
97
98
99
100
101
102
103
104
105
106
107
108public abstract class SocketChannel extends AbstractSelectableChannel implements ByteChannel, ScatteringByteChannel, GatheringByteChannel, NetworkChannel {
// 打开一个SocketChannel
public static SocketChannel open() throws IOException {
return SelectorProvider.provider().openSocketChannel();
}
// 打开一个SocketChannel并可连接到远程服务器
public static SocketChannel open(SocketAddress remote)
throws IOException
{
SocketChannel sc = open();
try {
sc.connect(remote);
} catch (Throwable x) {
try {
sc.close();
} catch (Throwable suppressed) {
x.addSuppressed(suppressed);
}
throw x;
}
assert sc.isConnected();
return sc;
}
// 返回标识此通道支持的操作的操作集。
public final int validOps() {
return (SelectionKey.OP_READ
| SelectionKey.OP_WRITE
| SelectionKey.OP_CONNECT);
}
// -- Socket-specific operations --
// 绑定到本地服务地址
public abstract SocketChannel bind(SocketAddress local)
throws IOException;
// 设置配置
public abstract <T> SocketChannel setOption(SocketOption<T> name, T value)
throws IOException;
// 在不关闭通道的情况下关闭读取连接。一旦关闭读取,那么在通道上的进一步读取将返回-1,流结束指示。如果连接的输入端已经关闭,那么调用此方法将不起作用。
public abstract SocketChannel shutdownInput() throws IOException;
// 在不关闭通道的情况下关闭写入连接。一旦关闭用于写入,那么进一步尝试写入通道将抛出ClosedChannelException。如果连接的输出端已经关闭,那么调用此方法将不起作用。
public abstract SocketChannel shutdownOutput() throws IOException;
// 获取当前通道的对应java.net的socket对象
public abstract Socket socket();
// 说明该通道的socket是否已连接。
public abstract boolean isConnected();
// 告知该通道上的连接操作是否正在进行。
public abstract boolean isConnectionPending();
// 连接到远程的socket地址
public abstract boolean connect(SocketAddress remote) throws IOException;
/**
* 完成连接套接字通道的过程。
* 非阻塞连接操作是通过将套接字通道置于非阻塞模式,然后调用其连接方法来启动的。一旦建立了连接,或者尝试失败,套接字通道将变得可连接,并且可以调用此方法来完成连接序列。
* 如果连接操作失败,则调用此方法将导致抛出适当的IOException。
* 如果该通道已经连接,则该方法不会阻塞,并将立即返回true。
* 如果此通道处于非阻塞模式,则如果连接过程尚未完成,则此方法将返回false。
* 如果该通道处于阻塞模式,则该方法将阻塞,直到连接完成或失败,并且总是返回true或抛出描述失败的checked异常。
*/
public abstract boolean finishConnect() throws IOException;
// 获取远端服务器地址
public abstract SocketAddress getRemoteAddress() throws IOException;
// -- ByteChannel 特有的方法 --
// 将通道内的数据读入buffer
public abstract int read(ByteBuffer dst) throws IOException;
// 将通道内的数据读入buffer
public abstract long read(ByteBuffer[] dsts, int offset, int length)
throws IOException;
// 将通道内的数据读入buffer
public final long read(ByteBuffer[] dsts) throws IOException {
return read(dsts, 0, dsts.length);
}
// 将buffer的信息写入通道
public abstract int write(ByteBuffer src) throws IOException;
// 将buffer的信息写入通道
public abstract long write(ByteBuffer[] srcs, int offset, int length)
throws IOException;
// 将buffer的信息写入通道
public final long write(ByteBuffer[] srcs) throws IOException {
return write(srcs, 0, srcs.length);
}
// 获取本机地址信息
public abstract SocketAddress getLocalAddress() throws IOException;
}
5.5.2 SocketChannel重要方法知识点
在socketChannel中没有指定超时时间的connect()方法,当connect()方法在非阻塞模式下被调用时SocketChannel提供并发连接:它发起对请求地址的连接并且立即返回值。如果返回值是true,说明连接立即建立了(这可能是本地环回连接);如果连接不能立即建立,connect()方法会返回false且并发地继续连接建立过程。假如某个SocketChannel上当前正由一个并发连接,isConnectPending()方法就会返回true值。
调用finishConnect()方法来完成连接过程,该方法任何时候都可以安全地进行调用。假如在一个非阻塞模式的SocketChannel对象上调用finishConnect()方法,将可能出现下列情形之一:
connect()方法尚未被调用。那么将产生NoConnectionPendingException异常。- 连接建立过程正在进行,尚未完成。那么什么都不会发生,
finishConnect()方法会立即返回false值。 - 在非阻塞模式下调用
connect()方法之后,SocketChannel又被切换回了阻塞模式。那么如果有必要的话,调用线程会阻塞直到连接建立完成,finishConnect()方法接着就会返回true值。 - 在初次调用connect()或最后一次调用
finishConnect()之后,连接建立过程已经完成。那么SocketChannel对象的内部状态将被更新到已连接状态,finishConnect()方法会返回true值,然后SocketChannel对象就可以被用来传输数据了。 - 连接已经建立。那么什么都不会发生,
finishConnect()方法会返回 true 值。
当通道处于中间的连接等待(connection-pending)状态时,您只可以调用finishConnect()、isConnectPending()或isConnected()方法。一旦连接建立过程成功完成,isConnected()将返回 true 值。
下面我们使用一段伪代码来模拟连接1
2
3
4
5
6
7
8
9InetSocketAddress addr = new InetSocketAddress(host, port);
SocketChannel sc = SocketChannel.open( );
sc.configureBlocking (false);
sc.connect(addr);
while (!sc.finishConnect()) {
// 执行一些等待的操作
}
// 执行socketChannel相关的操作
sc.close();
如果尝试异步连接失败,那么下次调用finishConnect()方法会产生一个适当的经检查的异常以指出问题的性质。通道然后就会被关闭并将不能被连接或再次使用。
connect()和finishConnect()方法是互相同步的,并且只要其中一个操作正在进行,任何读或写的方法调用都会阻塞,即使是在非阻塞模式下。如果此情形下您有疑问或不能承受一个读或写操作在某个通道上阻塞,请用isConnected()方法测试一下连接状态。
5.6 DatagramChannel
5.6.1 DatagramChannel类方法介绍
SocketChannel模拟的是连接导向的流协议(TCP/IP),DatagramChannel模拟的是包导向的无连接协议(UDP/IP)
首先我们看一下DatagramChannel的类方法1
2
3
4
5
6
7
8
9
10
11
12
13
14
15
16
17
18
19
20
21
22
23
24
25
26
27
28
29
30
31
32
33
34
35
36
37
38
39
40
41
42
43
44
45
46
47
48
49
50
51
52
53
54
55
56
57
58
59
60
61
62
63
64
65
66
67
68
69
70
71
72
73
74
75
76
77
78
79
80
81
82
83
84
85
86
87
88
89
90
91
92
93public abstract class DatagramChannel extends AbstractSelectableChannel implements ByteChannel, ScatteringByteChannel, GatheringByteChannel, MulticastChannel {
// 打开一个DatagramChannel并可连接到远程服务器,通过调用系统范围默认SelectorProvider对象的openDatagramChannel方法创建新通道。通道将无法连接。
public static DatagramChannel open() throws IOException {
return SelectorProvider.provider().openDatagramChannel();
}
// 打开一个DatagramChannel并可连接到远程服务器,family参数用于指定协议族
public static DatagramChannel open(ProtocolFamily family) throws IOException {
return SelectorProvider.provider().openDatagramChannel(family);
}
// 返回标识此通道支持的操作的操作集。
public final int validOps() {
return (SelectionKey.OP_READ
| SelectionKey.OP_WRITE);
}
// -- Socket-specific operations --
// 绑定到本地服务地址
public abstract DatagramChannel bind(SocketAddress local)
throws IOException;
// 设置配置
public abstract <T> DatagramChannel setOption(SocketOption<T> name, T value)
throws IOException;
// 获取当前通道的对应java.net的socket对象
public abstract DatagramSocket socket();
// 判断是否连接,数据报socket的无状态性质不需要同远程系统进行对话来建立连接状态。没有实际的连接,只有用来指定允许的远程地址的本地状态信息。
// DatagramChannel上没有单独的finishConnect()方法。我们可以使用isConnected()方法来测试一个数据报通道的连 接状态。
public abstract boolean isConnected();
// 连接远程服务器
// DatagramChannel对数据报socket的连接语义不同于对流socket的连接语义。
// 有时候,将数据报对话限制为两方是很可取的。将DatagramChannel置于已连接的状态可以使除了它所“连接”到的地址之外的任何其他源地址的数据报被忽略。
// 当DatagramChannel已连接时,使用同样的令牌,您不可以发送包到除了指定给connect()方法的目的地址以外的任何其他地址。试图一定要这样做的话会导致一个SecurityException异常。
// 之后,每次send/receive时就不会再有安全检查了,因为来自或去到任何其他地址的包都是不允许的。
public abstract DatagramChannel connect(SocketAddress remote)
throws IOException;
// 断开此通道的socket
public abstract DatagramChannel disconnect() throws IOException;
// 获取远端服务器地址
public abstract SocketAddress getRemoteAddress() throws IOException;
// 通过此通道接收数据报
// 在阻塞模式下,receive()可能无限的休眠直到有包到达。
// 在非阻塞模式下没有可接收的包则会返回null。如果包内的数据超出缓冲区承受范围,多余的数据则会直接丢弃。
public abstract SocketAddress receive(ByteBuffer dst) throws IOException;
// 通过此通道发送数据报 src-包含要发送的数据报的缓冲区, target-数据报要发送到的地址。
// 调用send()方法会从当前的position开始到末尾处结束。在阻塞模式下,调用线程可能会休眠直到数据报被加入传输队列。
// 在非阻塞情况下,返回值要么是字节缓冲区的字节数,要么是0。
// 发送数据报是一个全有或者全无的行为。如果传输队列没有足够的空间承载整个数据报,那什么内容都不会被发送。
public abstract int send(ByteBuffer src, SocketAddress target)
throws IOException;
// -- ByteChannel operations --
// 将通道内的数据读入buffer
public abstract int read(ByteBuffer dst) throws IOException;
// 将通道内的数据读入buffer
public abstract long read(ByteBuffer[] dsts, int offset, int length)
throws IOException;
// 将通道内的数据读入buffer
public final long read(ByteBuffer[] dsts) throws IOException {
return read(dsts, 0, dsts.length);
}
// 将buffer的信息写入通道
public abstract int write(ByteBuffer src) throws IOException;
// 将buffer的信息写入通道
public abstract long write(ByteBuffer[] srcs, int offset, int length)
throws IOException;
// 将buffer的信息写入通道
public final long write(ByteBuffer[] srcs) throws IOException {
return write(srcs, 0, srcs.length);
}
// 获取本机地址信息
public abstract SocketAddress getLocalAddress() throws IOException;
}
5.6.2 启动DatagramChannel
DatagramSocketCHannel对象既可以充当服务端也可以充当客户端。如果我们需要创建一个通道来进行监听,那通道必须绑定到一个端口或者地址/端口的组合上。1
2
3
4
5
6try (final DatagramChannel datagram = DatagramChannel.open()){
datagram.bind(new InetSocketAddress(8080));
// do something
} catch (IOException e) {
e.printStackTrace();
}
5.6.3 数据报与流socket对比
数据报通道不同于流socket。由于它们的有序而可靠的数据传输特性,流socket非常得有用。大多数网络连接都是流socket(TCP/IP就是一个显著的例子)。但是,像TCP/IP这样面向流的的 协议为了在包导向的互联网基础设施上维护流语义必然会产生巨大的开销,并且流隐喻不能适用所有的情形。数据报的吞吐量要比流协议高很多,并且数据报可以做很多流无法完成的事情。
下面列出了一些选择数据报socket而非流socket的理由:
- 您的程序可以承受数据丢失或无序的数据。
- 您希望“发射后不管”(fire and forget)而不需要知道您发送的包是否已接收。
- 数据吞吐量比可靠性更重要。
- 您需要同时发送数据给多个接受者(多播或者广播)。
- 包隐喻比流隐喻更适合手边的任务。
5.6.4 DatagramChannel知识点
DatagramChannel是无连接的,每个数据包都是一个自包含的实体,拥有它自己的目的地址。与面向流的socket不同,DatagramChannel可以发送单独的数据到不同的目的地址。同样也可以接受来自任意地址的数据。- 假设一个
DatagramChannel没有绑定,他也仍然能接收数据包。因为当底层创建socket的时候会动态生成一个端口号分配给它。当进行数据发送的时候,发送的数据包中会含有DatagramChannel的源地址数据(带端口)。 - 数据之间的实际发送和接收是通过
send()和receive()方法来实现的。 - 如果安装了安全管理器,那么每次调用
send()或receive()时安全管理器的checkConnect()方法都会被调用以验证目的地址,除非通道处于已连接的状态。 - 数据报协议的不可靠性是固有的,它们不对数据传输做保证。send()方法返回的非零值并不表示数据报到达了目的地,仅代表数据报被成功加到本地网络层的传输队列。
DatagramChannel对象可以任意次数地进行连接或断开连接。每次连接都可以到一个不同的远程地址。调用disconnect()方法可以配置通道,以便它能再次接收来自安全管理器(如果已安装)所允许的任意远程地址的数据或发送数据到这些地址上。DatagramChannel处于已连接状态时,发送数据将不用提供目的地址而且接收时的源地址也是已知的。这意味着DatagramChannel已连接时可以使用常规的read()和write()方法,包括scatter/gather形式的读写来组合或分拆包的数据:
5.6.5 DatagramChannel实现时间服务器
服务端代码1
2
3
4
5
6
7
8
9
10
11
12
13
14
15
16
17
18
19
20
21
22
23
24
25
26
27
28
29
30
31
32
33
34
35
36
37
38
39
40
41
42public class DatagramChannelTimeServer {
private final DatagramChannel channel;
private static final Integer DEFAULT_PORT = 37;
private static final long DIFF_1900 = 2208988800L;
public DatagramChannelTimeServer() throws IOException {
this.channel = DatagramChannel.open();
this.channel.bind(new InetSocketAddress(DEFAULT_PORT));
System.out.println("Listening on port " + DEFAULT_PORT + " for time requests");
}
public static void main(String[] args) throws IOException {
final DatagramChannelTimeServer server = new DatagramChannelTimeServer();
server.listen();
}
/**
* 使用8字节中的后4字节有两个好处
* 1. 节省网络传输空间
* 2. 因为在 2106-02-07 14:28:15 前只需要四字节就能存储当前的时间,只传递4字节也能避免不同操作系统的大端或者小端转换的问题。只要将4位放到对应位置
*/
public void listen() throws IOException {
final ByteBuffer longBuffer = ByteBuffer.allocate(8);
longBuffer.order(ByteOrder.BIG_ENDIAN);
longBuffer.putLong(0, 0);
longBuffer.position(4);
final ByteBuffer buffer = longBuffer.slice();
while (true) {
buffer.clear();
final SocketAddress socketAddress = this.channel.receive(buffer);
if (socketAddress == null) {
continue;
}
System.out.println("Time request from " + socketAddress);
// 将接受到的数据清空
buffer.clear();
longBuffer.putLong(0, (System.currentTimeMillis() / 1000) + DIFF_1900);
this.channel.send(buffer, socketAddress);
}
}
}
客户端代码1
2
3
4
5
6
7
8
9
10
11
12
13
14
15
16
17
18
19
20
21
22
23
24
25
26
27
28
29
30
31
32
33
34
35
36
37
38
39
40
41
42
43
44
45
46
47
48
49
50
51
52
53
54
55
56
57
58
59
60
61
62
63
64
65
66
67
68
69
70
71
72
73
74
75
76
77
78
79
80
81
82public class DatagramChannelTimeClient {
private final List<String> remoteHosts;
private final DatagramChannel channel;
private static final Integer DEFAULT_PORT = 37;
private static final long DIFF_1900 = 2208988800L;
public DatagramChannelTimeClient() throws IOException {
this.remoteHosts = Arrays.asList("localhost");
this.channel = DatagramChannel.open();
}
public static void main(String[] args) throws Exception {
final DatagramChannelTimeClient service = new DatagramChannelTimeClient();
service.sendRequests();
service.getPipelines();
}
public void sendRequests() throws IOException {
final ByteBuffer buffer = ByteBuffer.allocate(1);
for (String remoteHost : this.remoteHosts) {
// 用于发送一个空数据请求
buffer.clear().flip();
channel.send(buffer, new InetSocketAddress(remoteHost, DEFAULT_PORT));
}
}
// 获取返回的响应数据
public void getPipelines() throws Exception {
// 申请一个8字节的buffer用于存储long类型的数据
final ByteBuffer longBuffer = ByteBuffer.allocate(8);
// 使用大端模式
longBuffer.order(ByteOrder.BIG_ENDIAN);
// 给整个buffer置空
longBuffer.putLong(0, 0);
// 将位置移动到小端的32字节的第一个字节
longBuffer.position(4);
// 切片缓冲;给出低阶32位的视图
final ByteBuffer buffer = longBuffer.slice();
final int expect = remoteHosts.size();
int replies = 0;
while (true) {
InetSocketAddress sa;
sa = this.receivePacket(channel, buffer);
buffer.flip();
replies++;
this.printTime(longBuffer.getLong(0), sa);
if (replies == expect) {
System.out.println ("All packets answered");
break;
}
System.out.println ("Received " + replies + " of " + expect + " replies");
}
}
protected void printTime(long remote1900, InetSocketAddress sa) {
// local time as seconds since Jan 1, 1970
final long local = System.currentTimeMillis() / 1000;
// remote time as seconds since Jan 1, 1970
final long remote = remote1900 - DIFF_1900;
final Date remoteDate = new Date(remote * 1000);
final Date localDate = new Date(local * 1000);
final long skew = remote - local;
System.out.println("Reply from " + sa.getHostName() + ":" + sa.getPort());
System.out.println(" there: " + remoteDate);
System.out.println(" here: " + localDate);
System.out.print(" skew: ");
if (skew == 0) {
System.out.println("none");
} else if (skew > 0) {
System.out.println(skew + " seconds ahead");
} else {
System.out.println((-skew) + " seconds behind");
}
}
protected InetSocketAddress receivePacket(DatagramChannel channel, ByteBuffer buffer) throws Exception {
buffer.clear();
// Receive an unsigned 32-bit, big-endian value
return ((InetSocketAddress) channel.receive(buffer));
}
}
六、管道
6.1 Pipe类介绍
java.nio.channels包中含有一个名为Pipe(管道)的类。广义上讲,管道就是一个用来在两个实体之间单向传输数据的导管。Unix系统中,管道被用来连接一个进程的输出和另一个进程的输入。Pipe类实现一 个管道范例,不过它所创建的管道是进程内(在Java虚拟机进程内部)而非进程间使用的。
我们看一下Pipe类的核心方法1
2
3
4
5
6
7
8
9
10
11
12
13
14
15
16
17
18
19
20
21
22
23
24
25
26
27
28
29
30
31
32
33
34
35
36
37
38public abstract class Pipe {
// 作为数据输入源的可读通道
public static abstract class SourceChannel extends AbstractSelectableChannel implements ReadableByteChannel, ScatteringByteChannel {
protected SourceChannel(SelectorProvider provider) {
super(provider);
}
// 返回标识此通道支持的操作的操作集。管道源通道只支持读取,因此该方法返回SelectionKey.OP_READ。
public final int validOps() {
return SelectionKey.OP_READ;
}
}
// 作为数据输出源的可写通道
public static abstract class SinkChannel extends AbstractSelectableChannel implements WritableByteChannel, GatheringByteChannel {
protected SinkChannel(SelectorProvider provider) {
super(provider);
}
// 返回标识此通道支持的操作的操作集。管道源通道只支持写入,因此该方法返回SelectionKey.OP_WRITE。
public final int validOps() {
return SelectionKey.OP_WRITE;
}
}
protected Pipe() { }
// 获取输入源通道
public abstract SourceChannel source();
// 获取输出源通道
public abstract SinkChannel sink();
// 创建一个管道
public static Pipe open() throws IOException {
return SelectorProvider.provider().openPipe();
}
}
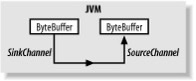
下图描述了管道的读写关系,可以往sinkChannel中写入数据,然后通过sourceChannel读取写入的数据。这两个通道实例是在Pipe对象创建的同时被创建的,可以通过在 Pipe对象上分别调用source()和sink()方法来取回。
请注意,SinkChannel和SourceChannel都由AbstractSelectableChannel引申而来(所以也是从SelectableChannel引申而来),这意味着pipe通道可以同选择器一起使用。
管路所能承载的数据量是依赖实现的(implementation-dependent)。唯一可保证的是写到SinkChannel中的字节都能按照同样的顺序在SourceChannel上重现。
6.2 使用Pipe类实现通道输入输出
1 | public class PipeTest { |
七、通道工具类
| 方法 | 返回 | 描述 |
|---|---|---|
| newChannel(InputStream in) | ReadableByteChannel | 返回一个将从给定的输入流读取数据的通道。 |
| newChannel(OutputStream out) | WritableByteChannel | 返回一个将向给定的输出流写入数据的通道。 |
| newInputStream(ReadableByteChannel ch) | InputStream | 返回一个将从给定的通道读取字节的流。 |
| newOutputStream(WritableByteChannel ch) | OutputStream | 返回一个将向给定的通道写入字节的流。 |
| newReader(ReadableByteChannel ch, CharsetDecoder dec, int minBufferCap) | Reader | 返回一个reader,它将从给定的通道读取字节并依据提供的CharsetDecoder对读取到的字节进行解码。 |
| newReader(ReadableByteChannel ch, String csName) | Reader | 返回一个reader,它将从给定的 通道读取字节并依据提供的字符集名称将读取到的字节解码成字符。 |
| newWriter(WritableByteChannel ch, CharsetEncoder dec, int minBufferCap) | Writer | 返回一个writer,它将使用提供的CharsetEncoder对象对字符编码并写到给定的通道中。 |
| newWriter(WritableByteChannel ch, String csName) | Writer | 返回一个writer它将依据提供的字符集名称对字符编码并写到给定的通道中。 |